This track takes you up to the remote and isolated Middle Range of
the Kaimanawas with spectacular views along the rugged tops. It's
quite an exhilarating feeling to be out here, and on a good day it
is just about as close as you’ll get to experiencing the absolute
silence that you get in the real mountains without even having to
put the crampons on.
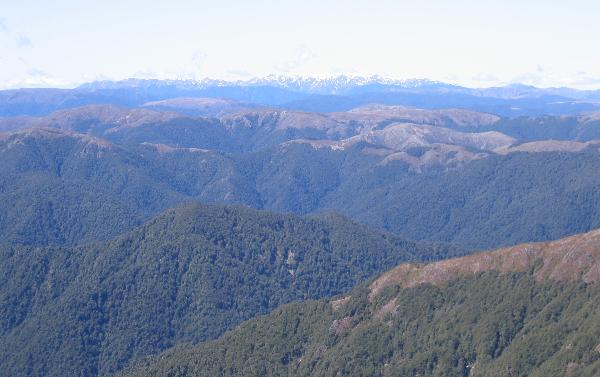
The view SE from Thunderbolt
Access onto the northern end of the Middle Range was previously
limited due to the necessity of crossing over private land. To get
around this problem, DOC have just cut a new track up through the
bush near Waipakihi hut which now completes a wonderful new circuit
- no permits required. You can now combine a walk along the tops of
both the Umukarikari and the Middle Ranges in one trip! Or if you
prefer, choose one and return down the Waipakihi River. See
attached map.
When scouting out this new route, I did the Umukarikari/Middle
Range circuit solo in a total of just over 11 hours from roadend to
roadend, including searching for a cache hide, checking on my other
caches, and feeding the sandflies at the hut. I started at The
Urchin car park, did the walk, and then jumped on my mountain bike
which I had waiting for me at the other end. I rode and pushed the
thing along the 5km of road to get me back to my car - I’d
forgotten how many hills there were on the road section! A total of
40km walking and a leg stretching 2800m total ascent - not counting
the road section. Unless you’re another gerbil, you might want to
allow a little longer. Three days would probably be good, with a
bivvy at the Waipakihi River the first night, followed by a night
at Waipakihi hut before walking out over the Umukarikari’s the
next. You could do the trip either way, however be warned that the
lower Waipakihi River crossing may be difficult after recent rain.
If you can cross safely lower down, chances are you’ll keep your
feet dry crossing again further up by the hut! For this reason it’s
probably safest to go anticlockwise and I will describe the route
accordingly.
Park your car at the start of The Urchin track. Don’t forget
that if you’re doing the complete loop, you might want to hide a
mountain bike at the Umukarikari car park, or arrange for a ride
back. Otherwise it’s a road bash back to your car. Go up The Urchin
and continue on down the other side to the Waipakihi River. There
is wonderful camping all along here. For those of you who have
already done the ‘Over the Umukarikaris’ cache, you will probably
have noticed the signpost pointing to Thunderbolt near the end of
the river-bash section. Walk upstream to the WP shown below where
you will find that signpost pointing the way across the river (not
the track shown on the topo maps). Grind your way up the steep, but
fairly well marked track through the bush until you come out on the
tops once more. There’s been a bit of windfall recently from the
unseasonable heavy snow, but it’s not too bad. Follow the cairns
and ridgeline up to your left. This will lead you all the way to
Thunderbolt itself and beyond. It took me 4.5 hours to Thunderbolt
peak from the carpark, but most people would be best to allow about
double that. I placed the cache here because, well, with a name
like that it had to be here really. But more importantly, it’s the
midpoint on the first leg which makes it an incentive to continue
onwards to complete the loop. It may not look it on the map, but
it’s only 6km further to do the whole circuit than to simply turn
around and go back up that nasty Urchin ascent!

Looking back along the the ridge from whence you
came
After signing the log, continue on along the tops until you get
to the highest point on your walk at 1660m. You'll be glad you put
that sunscreen on earlier about now. Wonderful views out over Taupo
from here. Make sure you turn left here (don’t continue along the
main ridgeline as I nearly did). There is no track as such and from
here you will need to be familiar with reading topo maps. Not
difficult, so long as you follow the right ridges. Have your
waypoints loaded and you should be fine. You can see the
Umukarikari ridgeline descending down to where the hut is - this is
the direction you’re heading.
When you eventually hit the bush line you’re greeted with nice
shiny new track markers - yay, the welcome wagon has arrived! A
nice gentle and well marked track down to the hut. If you’re coming
from the other direction, look out for the orange track markers on
poles which start just downstream from the hut on the true left of
the river. Pop your sunhat back on, and from here you can
river-bash back to The Urchin (blue line on map), or take the
Umukarikari back to the other carpark.
Note: This cache has been moved approx 4km from original spot
- be sure to update your coordinates!
Cache is a 200ml sistema. Please tuck it back up in bed
afterwards - it gets cold in the winter. You might want to check
out the spoiler, as I'd hate for you to come all the way out here
for nothing
