
 The Devil’s Punchbowl is a well-exposed plunging syncline
in the Punchbowl Formation. A nature trail provides close
access to both limbs of the fold.
The Devil’s Punchbowl is a well-exposed plunging syncline
in the Punchbowl Formation. A nature trail provides close
access to both limbs of the fold.
After locating the
Devil's Punchbowl Earthcache, head down the nature trail to get
a close look at rock that makes up the limbs of the fold you can
see from overlook near the visitor center. While this is only a
1-mile long trail, it has significant elevation changes so it is
still a challenging walk. Go prepared with water.
At the given coordinates, a short way off the trail along rock,
you will find an outcrop of the Punchbowl Formation. You can learn
the age of this formation from the
Devil's Punchbowl Earthcache. Here you can see that this
formation is made up of cobbly to pebbly sandstone and sandstone.
As you examine other areas you will find layers of siltstone.
Breccia, a sedimentary rock made up of large angular rock pieces
cemented together with finer material can be found at the bottom of
the formation, and thus is the oldest part of the formation. A
description of these layers called strike and dip are used to
identify and describe the syncline. The following activities will
provide you a rough way to estimate the strike and dip of the rock
layers.
 Looking at the outcrop you can see that the
south side of the rock has a roughly flat surface and that
surface is roughly parallel to a layers in the rock. It is
also obvious that the flat surface is dipping down into the
ground. Now take a pencil and place it on the rock so it is
horizontal like the black arrow on the orange layer in the
image to the right. The compass direction the pencil is
pointing is called the strike (either direction is correct).
http://college.hmco.com/geology/resources/protected/physicallab/thelab/geologicmaps/activities/activity1/activity1.htm
Looking at the outcrop you can see that the
south side of the rock has a roughly flat surface and that
surface is roughly parallel to a layers in the rock. It is
also obvious that the flat surface is dipping down into the
ground. Now take a pencil and place it on the rock so it is
horizontal like the black arrow on the orange layer in the
image to the right. The compass direction the pencil is
pointing is called the strike (either direction is correct).
http://college.hmco.com/geology/resources/protected/physicallab/thelab/geologicmaps/activities/activity1/activity1.htm
Now estimate the angle from horizontal that the layer is
dipping, the vertical arrow on the tan area. Notice that the angle
will always be between 0 and 90 degrees and is perpendicular to
strike. The compass direction of the dip is also required. That
angle and direction is called the dip. Keep these numbers as they
are part of the logging requirements.
 On a geologic map these measurements are
represented by a long line in the direction of the strike and
a short line pointing downslope with a number representing the
angle. In this example pictured (north being up) the strike is
about 45 degrees with the beds dipping down to the northwest
57 degrees below horizontal.
On a geologic map these measurements are
represented by a long line in the direction of the strike and
a short line pointing downslope with a number representing the
angle. In this example pictured (north being up) the strike is
about 45 degrees with the beds dipping down to the northwest
57 degrees below horizontal.
Now go to the secondary coordinates (N34 24.773 W117 51.337)and
find a similar place to do the same thing. If you don’t like any of
the outcrops at the secondary coordinates feel free to locate a
different one, just within about 200 feet. This strike and dip is
also part of the logging requirements.
If done correctly, notice how the beds dip toward each other
meeting underground to form a “U” shape. With the knowledge that
the older layers (light yellow on the bottom of the figure) are at
the bottom, we can identify this area as a syncline.
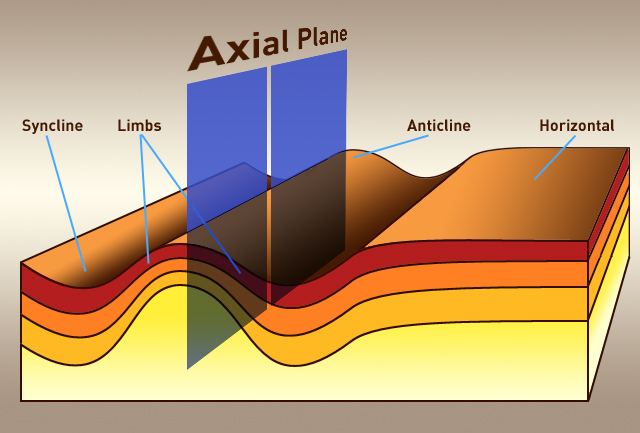
Diagram source:
fox-and-the-hound
 Now notice in the example how the layers in the
rock never meet on the surface, but here at the Devil’s
Punchbowl, you can see the layers wrap around in a “U” at the
surface. If you take example C from above and push one side
down you end up with the picture shown to the right. And where
the layers wrap around at the north of the picture, looks more
like what we see at the punchbowl. Notice how the syncline
dips (the direction of the arrow) away from the “U”.
Now notice in the example how the layers in the
rock never meet on the surface, but here at the Devil’s
Punchbowl, you can see the layers wrap around in a “U” at the
surface. If you take example C from above and push one side
down you end up with the picture shown to the right. And where
the layers wrap around at the north of the picture, looks more
like what we see at the punchbowl. Notice how the syncline
dips (the direction of the arrow) away from the “U”.
For another example, take a sheet of paper and shape it in a “U”
horizontal to the ground and look at it from above. The edges of
the paper are parallel and never meet, example 3 from above. Now
point one end slightly down and the ends of the paper become
visible in a “U” shape, the plunging syncline and the Punchbowl
example.
Logging requirements:
Send me a note with :
- The text "GC1ABZY The Devil’s Punchbowl – A Plunging Syncline"
on the first line
- The number of people in your group.
- The strike and dip at the first location
- The strike and dip at the second location
- The direction the Devil’s Punchbowl is dipping
The above information was compiled from the
following sources:
- Chester, Fredrick M. 1999, Field Guide to the
Punchbowl Fault Zone at Devils Punchbowl Los Angels County Park,
California, V. 2.1, January 1999 Center for Tectonophysics, Dept.
of Geology and Geophysics, Texas A& M University, College
Station, TX
-
http://college.hmco.com/geology/resources/protected/physicallab/thelab/geologicmaps/activities/activity1/activity1.htm
-
http://www.geo.utexas.edu/courses/303/303_Lab/Geologic%20Maps%20Overheads.pdf
Please note that the methods described in here
to obtain a strike and dip are very crude and are rough estimates.
Additional information about the age and coorelation of individual
layers are also needed and have been obtained from the references
and assumed in the discussion.