Armageddon
The location of this cache was first explored on Nostradamus Day by Dave Chitty and some mates, and they thought is fitting to name the cave "Armageddon" since Nostradamus made predictions for the end of the world.
According to the Book of Revelation in the New Testament of the Bible, Armageddon is the prophesied location of a gathering of armies for a battle during the end times, variously interpreted as either a literal or a symbolic location. The term is also used in a generic sense to refer to any end of the world scenario.
Attempting this cache has some real dangers associated with it and failure to take them seriously could quickly result in the end of your world! DO NOT ATTEMPT this geocache if you are not proficient with the necessary rope access skills and a suitable climbing ability.
Caving is a highly physical adventure activity conducted underground where natural processes have created passages and caverns of varying sizes and complexity. Undertaking caving activities, including complex vertical caves or new caves, may need extra consideration. See the abstracts at the bottom of the page from the Australian Activity Standards (ASS) regarding Risk Management, Equipment, and Minimal Impact Practices. It should be noted that caving AAS is written primarily for wild and adventure caves.
Armageddon Cave - Geocache
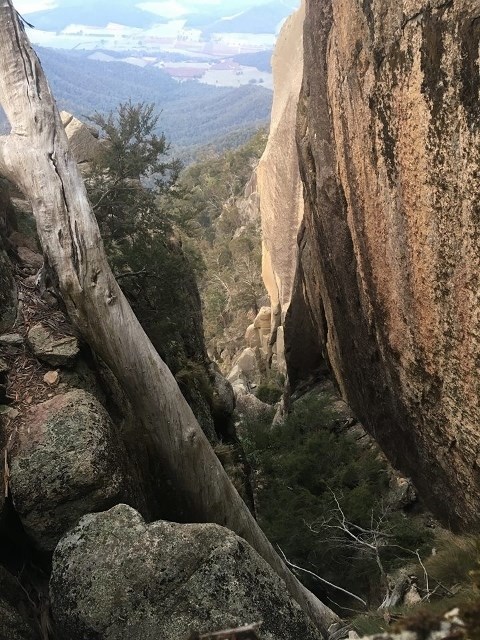
Reaching the cache will have you scramble, crawl, climb and abseil your way through this boulder infill ravine known as Burston’s Crevasse, some 400 metres long and descending about 150 metres into the Mount Buffalo Gorge. At the end of it you will abseil down into the Armageddon Cave.
Stage 1: Navigate Burston’s Crevasse.
From the posted coordinates navigate along the faint single track until you reach the top of the crevasse.
This is where you will take your first drop into the crevasse. Ropes are not necessary during this stage but you should have a helmet and headlight on for the rest of the journey.
The drop down is only short and soon you’ll be descending down the steep slope of the crevasse. Be mindful of loose rocks and the potential they have to fall on people below or cause you to slip.
As you move further down you will come to an area where you will need to duck under a couple of boulders.
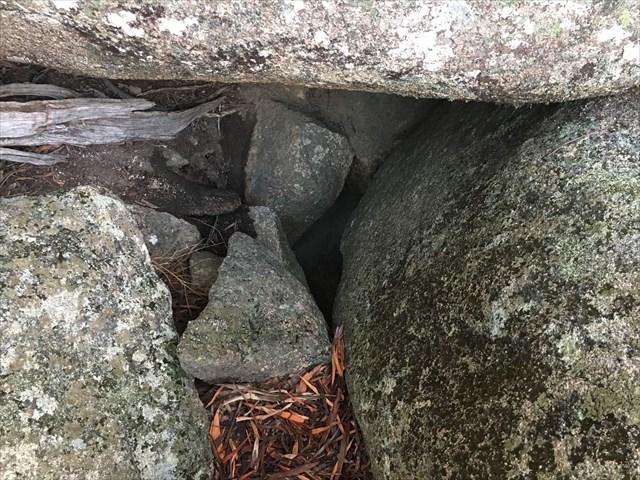
As you exit this area you will have 2 options. First you could climb down the steep open route you will find slightly to the left. (You may wish to abseil if you choose the left option.) The second and safer option is a fun easy crawl space decent. Find the hole to the right (see below picture) or exit towards the first option but turn right to find another bigger entrance to the crawl space.
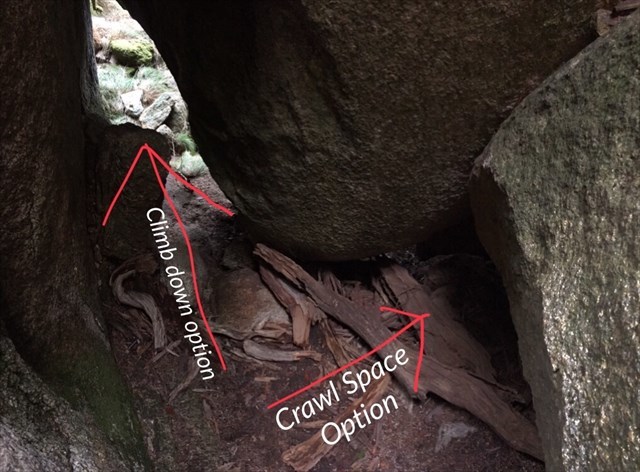
Once inside the crawl space watch your head. A light will be required in this crawl space and be warned, it requires a bit of a wiggle to get through.
Moving further down the crevasse, continue to be careful on the steep slope. Soon you will reach what appears to be the end, with a large drop in front of you. Congratulations, you’re standing above Armageddon Cave!
There is a small hole where you will begin your descent into the cave.
Stage 2: Armageddon Cave
At this point the real adventure begins. The following information will guide you to the cache, however, you must ensure you have all of the appropriate equipment and know how to set it up safely. There is a real risk of falling and it’s a long way down to the bottom. You should be secured to a rope at all times, either a short safety line or a working line that you’re descending or ascending on. Do not even consider this cache if you are not proficient with rope access situations!
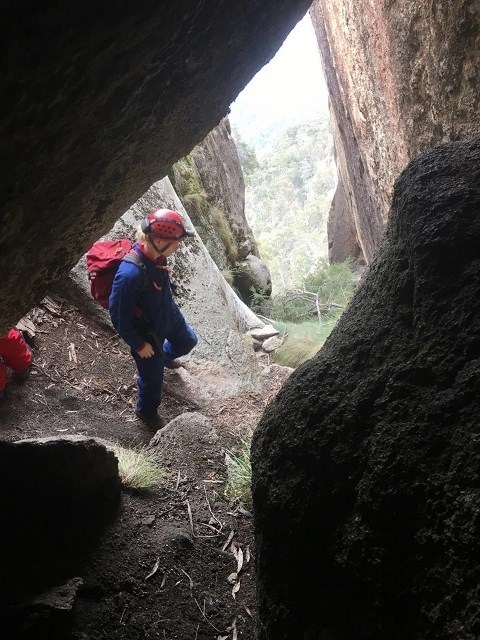
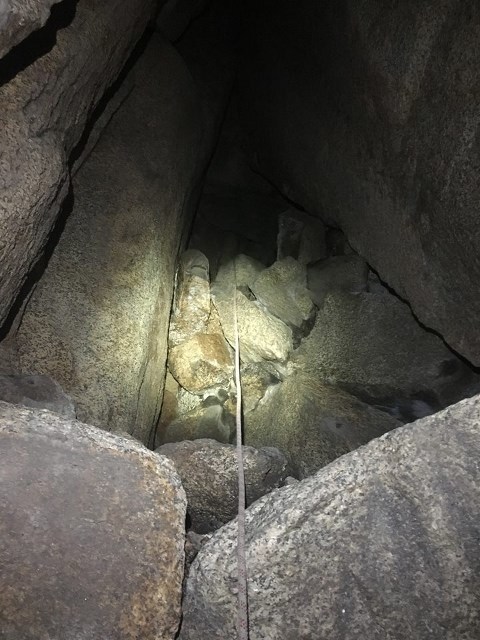
As you enter the hole there is a small ledge close to the top. This is where an anchor point can be created to descend further into the cave. Before entering the hole make sure you have a safety line attached as you do not want to slip and fall once inside. From this top ledge you will descend approx. 10-15m to another ledge half way down. The photo below is taken from the half way ledge.
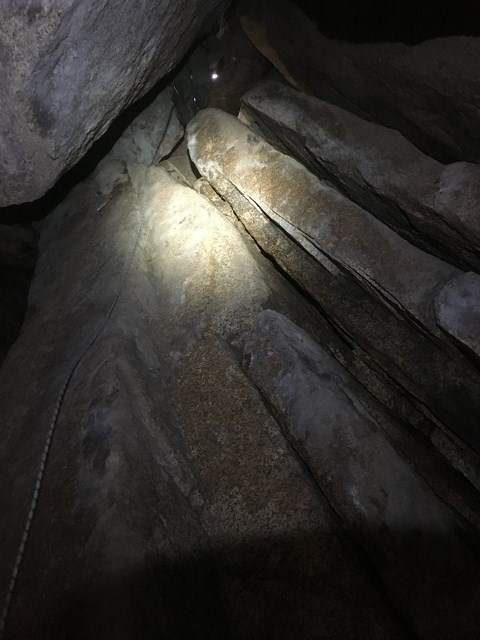
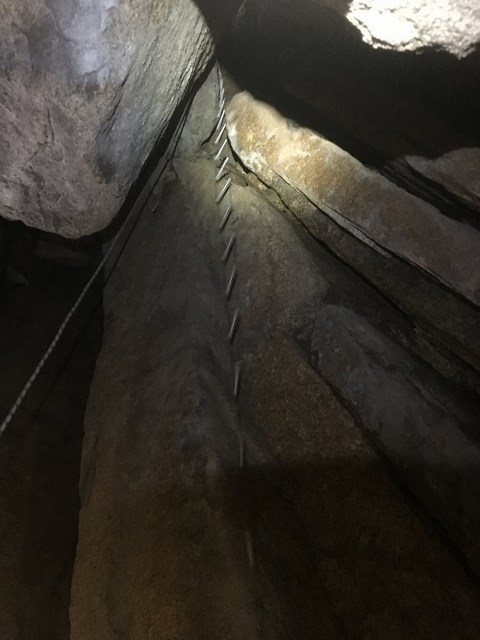
There is a permanent rope set up here which could be used to attach to, and to then follow up into the real cave section of Armageddon. Real cave meaning it is completely dark in this part. It is possible to climb without the rope at this point although it might be challenging for some. The rope could be used as a safety back up as a slip could see you fall approx. 20m to the cavern floor. The photo below shows the rope leading up into the cave.
*Serious caution should be used when in this area. You will not know the condition of the rope at the time you are there and it should not be considered a primary anchor. The rock in the area is not all solid so climb carefully.
**During placement of the cache one of the group members climbed up and then belayed everyone else from the top, approx. 8m, with another rope.
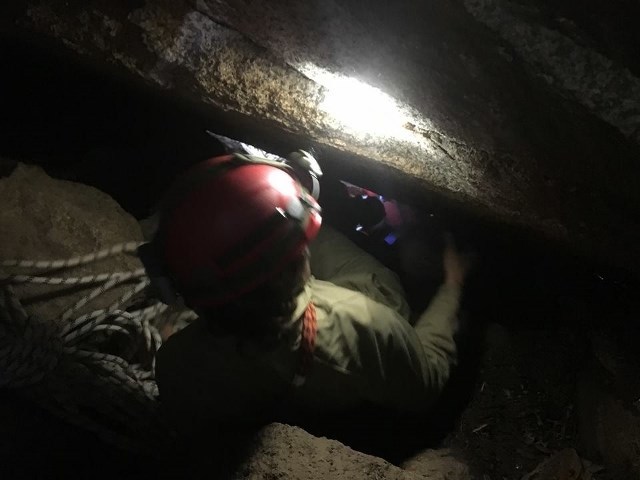
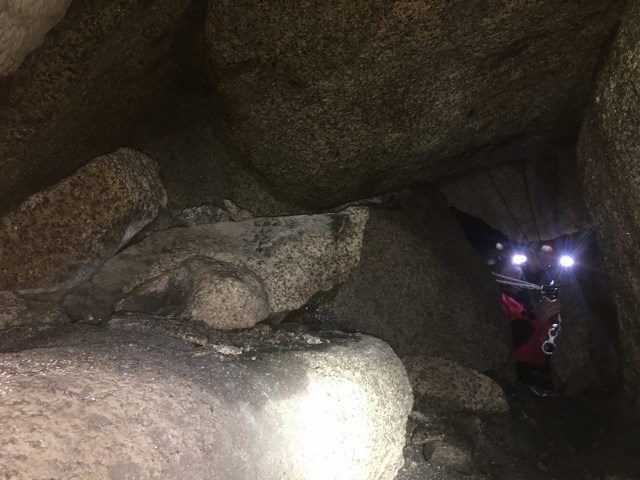
Go all the way to the top of the rope and you are at GZ. This part of the cave is not large but there is standing room. There is a ‘tunnel’ that you can crawl through for a few meters which has a hole at the other end which you can abseil down to the cavern floor below. It is completely dark in this area of the cave so please be very mindful of the hole as it's a long fall down.
Abseiling through the hole is not a necessary part of finding the cache but it does give you a good view down into the lower section of the crevasse through a large opening, and there is another small potential cave to explore halfway down this abseil as well.
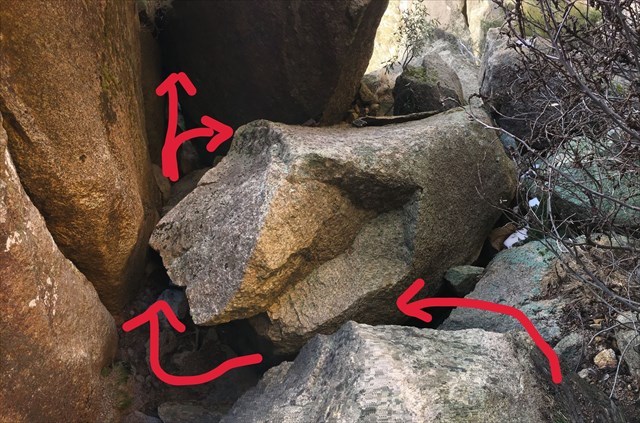
The picture below shows the crawl space and the guys about to descend through the hole. The cache is also located somewhere in the area featured in the photo.
The cache is a small clip top container hidden in a small horizontal gap. You do not need to go near the hole at the other end of the tunnel, in fact you can reach the cache while still attached to the rope you followed up into this area.
Once you have found the cache it’s time to exit. Please be careful of the loose rocks and stones, try not to knock any off into the lower sections of the area particularly if there are people below checking out that section. To exit the cave simply follow the same route out. The risk of falling is still very real and every precaution should be adhered to.
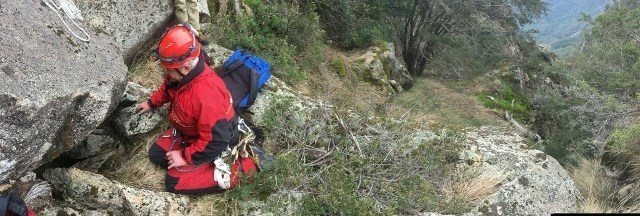
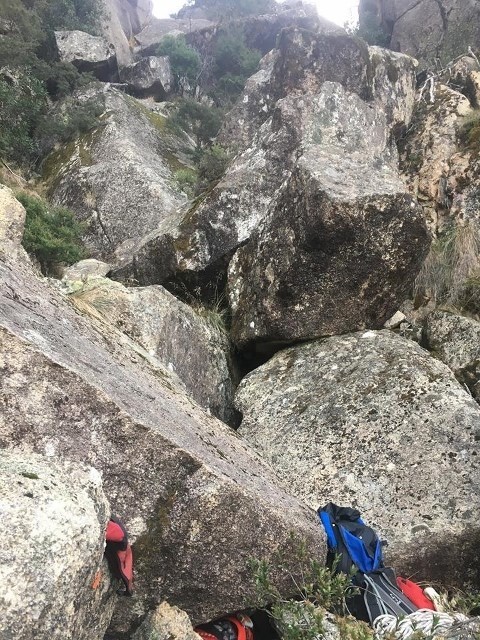
Once back above ground you can simply make your way safely out of the crevasse by retracing your steps. There is, however, another cave option which will lead you up the crevasse if you are interested. There is a photo included which shows the entrance to both Armageddon and this bonus cave. Ropes are not needed but a torch will be required. It's a fun little side option and the cavern is reasonably large.
Abstracts from the Australian Activity Standards
Risk Management
Risk is inherent in all outdoor activities and the AAS can help manage that risk. However it is not possible to eliminate all risk and those attempting this geocache need to accept that some risk remains and they should ensure that it is managed according to recognised methods.
Risk management is a series of ‘well-defined steps which, taken in sequence, support better decision making by contributing a greater insight into risks and their impacts' (Australian Standard AS/NZS 4360 Risk Management).
The five step approach is;
Step 1: Identify all hazards
Step 2: Assess and prioritise the risks these hazards create, deal with highest priority risk first
Step 3: Decide on measures to control the risks (e.g. eliminate the risk, substitute a venue, use of personal protective equipment)
Step 4: Implement appropriate control measures
Step 5: Monitor the control measures and review the process.
The identification of risks could be considered under the headings of ‘people’, ‘equipment’ and ‘environment’. Examples of risks associated with ‘people’ could be the lack of necessary skills or inadequate fitness. Risks associated with ‘equipment’ could include inadequate clothing for the area, and insufficient or incorrect equipment. Risks associated with ‘environment’ could include high winds, adverse or unseasonal weather, or increased impacts to the environment due to over use.
For the activity being undertaken and the group involved, foreseeable risks should be noted and strategies should be developed to avoid or minimise these risks. The strategies should be included in the activity plan.
You must assess the site for any unexpected hazards and change the activity plan if necessary. Information of any new hazard must be made available within the organisation, to the caving community and to the relevant land manager.
It is advisable to do this activity as a group, however, the cave is not large and certain risks, such as rocks falling, are increased with the size of the group. 4 people should be a maximum group size for this cave.
In an activity like this it is important that an emergency contact is aware of your plans and can enact an emergency procedure if they do not hear from you by an agreed time.
Equipment
Equipment requirements vary with the objectives of the activity plan and the environmental conditions likely to be encountered. When planning equipment requirements for a caving activity it is important to plan ahead as much as possible for all eventualities taking into account any appropriate information including forecast weather conditions.
Group equipment
The following equipment must be accessible during any caving activity involving dependent groups:
* first aid kit (basic kit to be taken into the cave and an accessible comprehensive kit).
* food and water if cave system warrants it (eating in a cave system should be avoided where possible).
* two watches.
* a pocket-knife.
* notebook and pencil.
* an appropriate “thermal” (e.g. thermal blanket, bivvy bag) wrapping are considered essential in wet caves and are recommended in all cave systems.
The following additional equipment must be available in the cave for any vertical caving activity involving dependent groups:
* all ropes must be appropriate for caving (synthetic kernmantle style, with a manufactured breaking strain of at least 20kn)
* an appropriate rescue system spare ‘emergency’ rope must be accessible when engaging in vertical caving
* both ascending and descending equipment must be carried and must be arranged in such a way that it can be quickly reversed. This is regardless of the intended direction of travel
* unless using equipment that specifies otherwise, there must always be two points of attachment when ascending or transferring on ropes
* appropriate descending devices must be used when abseiling
* appropriate steel wire caving ladders and attachments must be used in conjunction with belay lines.
Participant’s equipment
The following equipment requirements apply to all dependent participants:
* must wear a helmet with securely attached and fitted chinstrap and a well fitting cradle (construction helmet for example) in horizontal caves
* must carry reliable and independent primary and secondary light sources appropriate to the cave. In most caves within Victoria it is recommended that the primary light source be helmet-mounted or hands-free. Primary light sources must be helmet-mounted on vertical caving activities. AAS recommend a third independent light source be carried
* wear long-sleeved and long-legged clothing (shorts are not suitable) appropriate to the cave and conditions
* footwear must have a substantial tread and must be appropriate for the cave and conditions
* open footwear such as sandals or thongs should not be worn in caves and AAS recommend that boots with a sound tread are worn
* carry spare globes and batteries according to activity leaders experience and knowledge of group and conditions
* carry any personal medication and the activity leaders must understand the requirement
* access to emergency communication equipment
Minimal impact practices:
The need for a Minimal Impact Caving Code (MICC) has evolved over many years as cavers have realised the impact that they have on caves. That impact is so diverse and varied that it has become necessary to devise a caving code that ensures that cavers are aware of the measures that are necessary to reduce their impact on caves. Read the MICC carefully and apply it to all of your caving - it will not completely stop cavers damaging caves but it will certainly reduce their impact on the cave environment. This MICC was devised by cavers FOR CAVES - please assist the Caves of Australia by using these simple MICC techniques.
General Cave Visitation
* Remember EVERY caving trip has an impact.
* Where possible the party leader should have visited the cave previously and hence should be aware of sensitive features of the cave, the best anchor points, and generally reduce the need for unnecessary exploration. (See cache specific notes)
* Cave slowly. You will see and enjoy more, and there will be less chance of damage to the cave and to yourself. This especially applies when you are tired and exiting a cave.
* If there are beginners on a trip, make sure that they are close to an experienced caver, so that the experienced caver can help them when required, e.g. in difficult sections. Ensure that the party caves at the pace of the slowest caver.
* Keep your party size small - 4 is a good party size.
* Cave as a team - help each other through the cave. Don't split up unless impact is reduced by doing so.
* Constantly watch your head placement AND that of your party members. Let them know before they are likely to do any damage.
* Keep caving packs as small as possible or don't use them in sensitive caves or extensions.
* Ensure that party members don't wander about the cave unnecessarily.
* Stay on all marked or obvious paths. If no paths are marked or none is obvious - define ONE!
* Learn to recognise cave deposits or features that may be damaged by walking or crawling on them. Examples are:- Drip Holes, Stream Sediments, Paleo soils, Soil Cones, Crusts, Flowstone, Cave Pearls, Asphodilites, Bone material, Potential Archaeological sites, Cave Fauna, Coffee & Cream, Tree Roots
* Take care in the placement of hands and feet throughout a cave.
* Wash your caving overalls and boots regularly so that the spread of bacteria and fungi are minimised.
* If a site is obviously being degraded examine the site carefully to determine if an alternative route is possible. Any alternative route MUST not cause the same or greater degradation than the currently used route. If an alternative is available suggest the alternative route to the appropriate management authority and report the degradation.
* Carry in-cave marking materials while caving and restore any missing markers. Tape off sensitive areas you believe are being damaged and report the damage to the appropriate management authority.
* If it is necessary to walk on flowstone in a cave remove any muddied boots and or clothing before proceeding OR DON'T PROCEED! Sometimes it is better to assess the situation and return at a later date with the appropriate equipment.
* Treat the cave biota with respect, watch out for them, and avoid damaging them and their "traps", webs, etc. Also avoid directly lighting cave biota if possible.
* If bone material is found on existing or proposed tracks it should be moved off the track to a safer location if at all possible. Collection should only be undertaken with appropriate permission.
* If you eat food in a cave ensure that small food fragments are not dropped as this may impact the cave biota. One way is to carry a plastic bag to eat over and catch the food fragments. This can then be folded up and removed from the cave.
* Ensure that all foreign matter is removed from caves. This includes human waste. If long trips are to be made into a cave ensure that containers for the removal of liquid and solid waste are included on the trip inventory.
* When rigging caves with artificial anchors, e.g. traces, tapes, rope etc, ensure that minimal damage occurs to the anchor site by protecting the site. For example protect frequently used anchors, e.g. trees, with carpet, packs, cloth, etc. Bolts should only be used where natural anchors are inappropriate.
* CAVE SOFTLY!
Link to the Full Australian Activity Standards - Recreational Caving