Let’s face it; the main halls of the
mall have had their ups and downs. It used to be the home of just
about every major mall anchor store at one time or another and
still hosts its share of major chain outlets, as well as a good
selection of very welcome local businesses. A lot of new construction and
renovation projects are ongoing, so you may have to “excuse
some dust” while visiting the mall. A quick stroll through the
interior will reveal several vacancies, as well as a lot of
expansion; it’s quite a contradiction. It’s almost as if lots of
retailers want to move in, but no one wants used space! There is a
newly built 4 lane road running in back of the mall; with an
out-of-place stoplight guaranteed to catch you no matter what
direction you may be headed.
Who knows what the future will hold for this mall? The continuing renovation
sends out a good signal, but there never seems to be an end to
it. On with the
cache!
This cache is not for everyone, and is not designed to be solved in
under an hour. Be prepared to do a lot of walking! This cache is for those who enjoy
a challenge, and don’t mind wandering around the mall grounds
for the better part of a day. If you are very familiar with the
area, you will have a distinct advantage, but if not, a little
persistence will still get the job done. If I have not discouraged you
already, then read on and enjoy!
This is a 3 part puzzle:
- Decipher the Key
- Find the
Photos
- Find the
Cache
You may do parts 1 and 2 in any order, or work them both at the
same time. Some things
may come easy, some can be researched on the web, but an on-site
visit touring the grounds will be more than helpful! Once you have solved parts 1 and
2 correctly, you should have no problem with the third
part. You will never
have to step outside the bounds of the pictured key for any part
but the final (maybe).
However, there may be times when you may need to walk right up to
the edge.
PART 1: DECIPHER THE
KEY
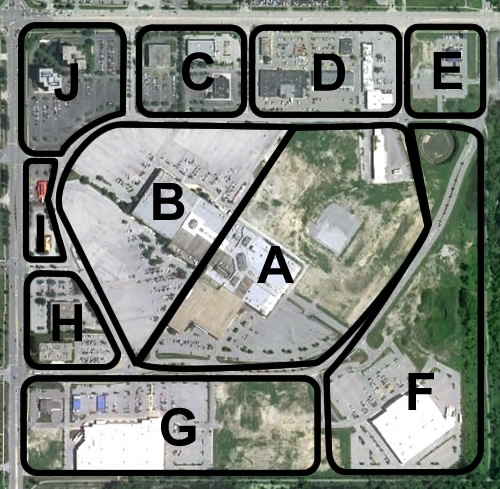
The Key Map is an overhead view of the mall bordered on the west by
Cicero, on the north by Route 30 (Lincoln Highway), on the south by
Old Plank Trail, and
on the east by an unnamed paved walkway. There are 10 regions
identified on the map as A-J. Once you answer the questions
below, each of these regions will uniquely correspond to a single
digit 0-9. Each digit
will represent one region only. For example, if you determine
that region A corresponds to the digit 1, you can eliminate 1 from
any other region on the map.
Do not worry if a question stumps you. By solving any question
correctly, you narrow down the selection for all the
others. You may also
“work backwards” by solving some of the obvious digits
in Part 2 (i.e. it’s a good bet the first photo is a 4, so
just determine which region it belongs in!)
Key Map
Questions:
A) If you were to stand
on a cement block facing the wall located at N 41° 29.949' W087°
43.848' and look up and to your right, how many white lines would
you see?
B) How many
fountains are in region I (excluding drinking
fountains)?
C) At N 41°
30.358' W 87° 43.716' looking south, what color stripe do you
see?
D) What color is
the device at N 41° 30.359'N W 087° 43.917'?
E) How many sides are there on the
street sign closest to 41° 30.150'N 87° 43.885'W? (No, not Front
and Back!)
F) From the
“Gift of the Rotary Club”, how many 100’s of
meters (rounded down) must you walk north to the mall’s outer
drive?
G) At N 41°
29.989' W 087° 43.704', what color is the background of the street
sign with the most words on it?
H) How many regions do not have a
deep circular reservoir of water?
I) How
many stoplight intersections are in the area displayed (Including
Route 30 and Cicero)?
J) Standing at N 41° 30.345' W
087° 43.373' looking east, what color stripes do you see, other
than White?
Answers:
0) 0 or
Green
1) 1 or
Yellow
2) 2 or
White
3) 3 or
Red
4) 4 or
Purple
5) 5 or
Blue
6) 6 or
Brown
7) 7 or
Orange
8) 8 or
Grey
9) 9 or
Black
PART 2: FIND
THE PHOTOS
This is very simple, but perhaps not easy. Use the photo essay to unlock the
coordinates for the final. Each photo was taken in one of
the regions on the key. Consider where the photo was
taken from, and the immediate subject of the shot. There may be clues in the distant
background you can use for assistance, but they are not to be
considered directly for determining the key region. Index your answers with the
solved key from part 1 and you will have your coordinates in
hand. Please note:
There may be more than one photo taken per region, and there may be
regions with no photos.
Photos are all taken from areas accessible to the general
public.
PART 3: FIND THE
CACHE
The final cache may or may not be located on the Key Map, but it is
within 2 miles of the published location; so please be careful as
to any assumptions you make on the “easy”
digits. There is a FTF
coin/travel bug for some lucky cacher!
Please feel free to contact me for purposes of clarification or any
errors noticed. I will
hand out “nudges” freely.
Designer Notes: The original version of this
cache included the names of businesses, albeit in a non-commercial
manner. This was not
allowed in the listing and it was reworked to eliminate
this. Anyone making a
similar cache should keep this in mind. I also must state, this made Part
1 better, as you now need to be on site to answer more of the
questions!
You can check your answers for this puzzle on
Geochecker.com.