Reel™ Explosive History Mystery Cache
Bob From Elsewhere: It's Time to renew the playing field with a letterbox cache to be hidden nearby soon.
Related Web Page
Please note Use of geocaching.com services is subject to the terms and conditions
in our disclaimer.
Another in an occasional series of exercises that use the Related Web Page to, "perform miscellaneous calculations with coordinates."
The cache is hidden within 3 km of the listed coordinates
In 1850 the South Australian Government decided to store all the Colony's explosives under Government supervision in powder magazines and three associated floating hulks in Magazine Creek off the North Arm of the Port River.
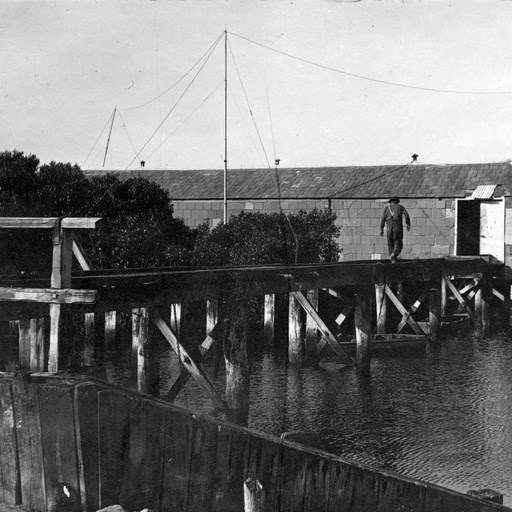
The North Arm Explosive Magazine, 1915
Photo: State Library of South Australia [PRG 280/1/12/32].
**********************************************************************
By the early 1900s however, the North Arm Explosive Magazine had become inadequate for the amount of explosives being imported into the State to be used in the construction, mining and quarrying industries.
In 1906 the Dry Creek explosives magazines were built in a large reserve of 287 acres. Ten separate buildings each capable of storing 30 tonnes of explosives were laid out in a long line, each surrounded on three sides by a large earth mound.
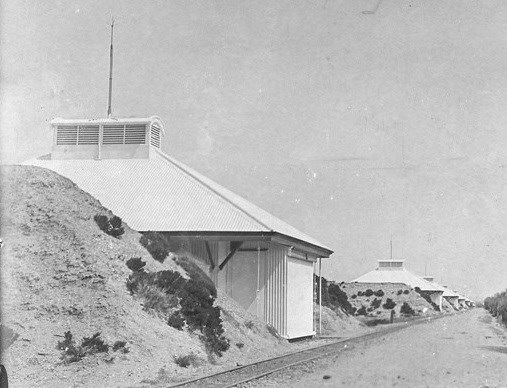
The Dry Creek Explosive Magazine, 1914
Photo: State Library of South Australia, [PRG 280/1/14/144].
**********************************************************************
At first the explosives were unloaded at the North Arm and transported by horse and dray to the new stores, but in 1906 a closer landing site was established by the construction of a wharf at the end of Broad Creek, south east of Barker Inlet. Then the imported explosives were unloaded onto hulks at the old 'powder ground' in the North Arm, with the explosives lightered to the Broad Creek Wharf.
In 1913 a new explosives berth was completed at Snapper Point (east of Outer Harbor) and explosives were then lightered to Broad Creek via Barker Inlet. Explosives were sometimes stored in floating hulks to supplement the magazine storage. Until 1939 all explosives were imported from the United Kingdom, but from the beginning of the Second World War they arrived from Victoria, firstly by sea and then from 1946 by rail to the Dry Creek Railway Yards.
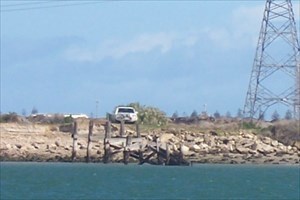
Snapper Point Explosive Mound Jetty, 2008

The Broad Creek Wharf, 1914.
Photo: State Library of South Australia, [PRG 280/1/14/78].
**********************************************************************
A 1.5 mile narrow gauge (2 feet) tram line was constructed between the Broad Creek Wharf and the Dry Creek Explosive Magazines. The explosives wagons were horse drawn directly to the door of the magazines for storage. The tram line also connected the Dry Creek Explosives Magazines to the Dry Creek Railway Yards for distribution by railway to the mines and quarries of South Australia.
From 1946 the horse drawn explosives wagons were used to transport the explosives delivered by railway from Victoria to the Dry Creek Railway Yards to the Dry Creek Explosives Magazines for storage.
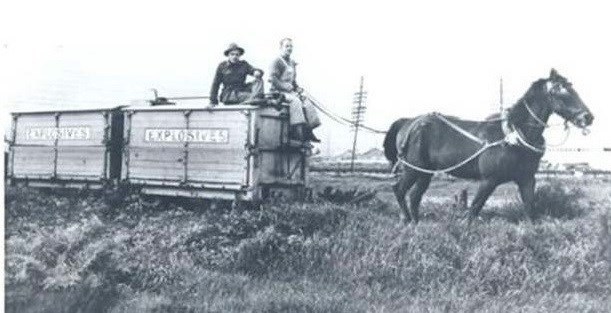
Horse Drawn Explosive Wagons.
**********************************************************************
The Dry Creek explosives depot continued operations in much the same way until about 1965, storing mainly mining and construction explosives. Most of the tram tracks were torn up in 1966 when two Leyland trucks were purchased to transport the explosives to the stores. However, it's still possible to see parts of the original tram line.
The operation of the Dry Creek Explosives Magazines ceased in October 1995.
Today the abandoned buildings of the Dry Creek Explosives Magazines are steadily deteriorating in condition. Vandalism is the main threat - at one time these buildings were remote, but now they are increasingly accessible to urban explorers and street artists. Rust and the passage of time is eroding the walls, while the support piles slowly sink. With the possibility of a large housing development being built nearby, the threat to these anachronisms increases dramatically.
The remnants of the listed historical locations can be seen near the following geocaches.
The North Arm, Explosive Magazine.
GC54RWX Fallian Marshes, (follow the track north, cross the creek at the causeway and continue north until you reach the remains of the wooden sheet piling as seen in the foreground of the image above.)
The Snapper Point, Explosive Mound Jetty.
GC4T6AR Once a Jetty, (the gallery has images of the location.)
The Broad Creek, Wharf.
GC19TAG There she blows, (access via Kayak only) (the gallery has images of the location.)
The Dry Creek, Explosive Magazine Reserve.
GC1822X Uneswido Wetland Walk and GC1EF2X Swan Lake
**********************************************************************
Alert: The information is for interest only and not required to find this geocache.
You are about to be directed to other webpages that contain further historical facts including sketches and additional photographs. As the cache owner, I represent that these pages are safe although they have not been checked by Groundspeak or by the reviewer for possible malicious content. Proceed at your own risk.
http://www.sahistorians.org.au/175/bm.doc/high-and-dry-by-the-mangroves-.pdf
https://en.wikipedia.org/wiki/North_Arm_Powder_Magazine
https://en.wikipedia.org/wiki/Dry_Creek_explosives_depot
**********************************************************************
The Puzzle
To find where the cache is hidden use the historical locations below and complete the following calculations.
Exercise 1 Find the distance between:
S 34° 49.550 E 138° 31.540 The North Arm, Explosive Magazine and
S 34° 46.090 E 138° 30.840 The Snapper Point, Explosive Mound Jetty
Equals ABCD metres
Exercise 2 Find the distance between:
S 34° 49.893 E 138° 34.862 The Dry Creek, Explosive Magazine Reserve and
S 34° 48.460 E 138° 33.915 The Broad Creek, Wharf
Equals EFGH metres
Exercise 3 Find the intersection point 2 of two circles where:
The centre of circle A is:
S 34° 46.090 E 138° 30.840 The Snapper Point, Explosive Mound Jetty
The radius of circle A is: ABCD metres
The centre of circle B is:
S 34° 49.893 E 138° 34.862 The Dry Creek, Explosive Magazine Reserve
The radius of circle B is: EFGH metres
Intersection point 2: equals South 34.KLMNO° East 138.PQRST°
Note: Use GeoCheck to check: If the calculation of Intersection Point 2 is correct.
Exercise 4 Find the actual location where the cache is hidden by:
Projecting RKMN metres @ TEB.D° from Intersection point 2:
**********************************************************************

Additional Hints
(No hints available.)
Treasures
You'll collect a digital Treasure from one of these collections when you find and log this geocache:

Loading Treasures