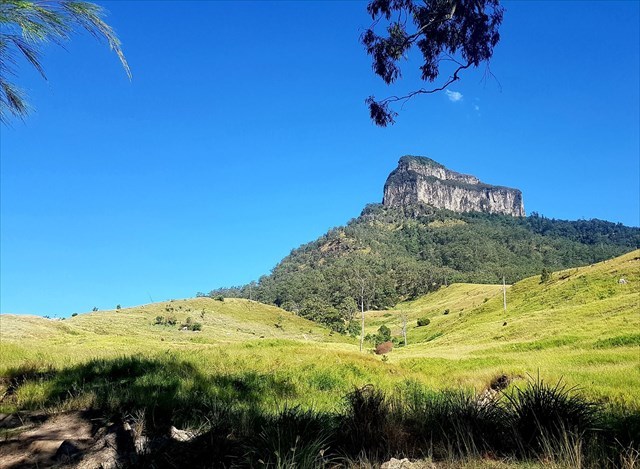
Mt Lindesay
Some 24 million years ago, a large shield volcano erupted in the vicinity of Focal Peak (the Focal Peak Volcano). It was one of several (Bunya Mountains, Main Range, Focal Peak, Tweed) that erupted in the area in succession around that time as the Australian plate drifted northwards over a hot spot in the Earth’s mantle. The Focal Peak Volcano succeeded the Main Range volcano and in turn it was succeeded by the larger Tweed Volcano centred over Mount Warning in New South Wales, whose lavas buried many of those from Focal Peak.
The lower parts of the Mt Lindesay are basalt originating from early Focal Peak lava flows (Albert and Kyogle Basalt).
A second major phase of activity beneath the Focal Peak volcano saw the magma type change to rhyolite, an event which is not uncommon in shield volcanoes. At about this time, some rhyolite erupted at the surface from vents in the vicinity of Mount Gillies. Subsequent rhyolite lava flows from this vent extended as far east as the Hillview Cliffs south of Kerry, about 25 kilometres. These rhyolitic rocks are known as the Mount Gillies Volcanics. Around the present day location of Mt Lindesay, the Mount Gillies Volanics covered the Kyogle basalt laid down earlier.
Some of these Mt Gillies Volcanics are very hard and resist erosion. This is the case at Mt Lindesay, where the harder rhyolite cap has resisted erosion and protected the relatively softer underlying basalts. As the surrounding rock has eroded, the impressive cliffs and peaks of Mt Lindesay remain, protected by their rhyolite cap.
Basaltic Columns
Being relatively fluid, basalt typically flows down the sides of the volcano a long way producing the large shield volcanos.
As the basalt flows cool, the lava solidifies into rock at the surface and shrinks. The shrinkage stresses increase as the lava cools, until they are relieved by the formation of a crack – a contraction joint. The cracks develop at right angles to the cooling surfaces, starting at the margins of the lava flow. The entire rock layer splits apart so that the crack tips advance through to the hot lava below.
As the lava underneath subsequently cools, the crack lengthens, relieving the shrinkage stresses layer by layer. Each stepwise lengthening of the cracks leaves a small ridge of stone (a “stria”) across the face of the column, showing where the crack tip stopped. The distance apart and alignment of these striae indicate the speed and direction of cooling.
It was commonly believed that the shrinkage tension was most satisfactorily relieved by the formation of cracks intersecting at angles of 120 degrees, separating the rock mass into hexagonal columns. The action is exactly similar to the formation of sun cracks in drying mud, only the shrinkage of mud is caused by the evaporation of some of the water in it, while that of basalt is caused by cooling.
However, field observations have shown that basalt columns can have as little as 3 and up to 12 sides. Modern thinking is that network of cracks do not evolve toward perfect hexagonal columns, but rather the cracks continue to move around as they advance step-wise into the cooling lava, resulting in an unsteady pattern with unevenly-shaped columns with different numbers of sides. More info can be found here.
Logging this Earthcache
To log this Earthcache, you must visit the listed coordinates and answer the following questions. You will need a small ruler or tape measure.
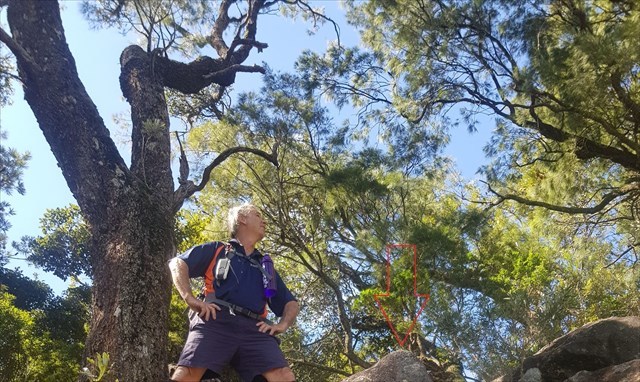
At the listed coordinates, stand next to the tree shown in the photo above. You will be standing on top of a basalt column -see the red arrow, which has toppled and is now horizontal.
- Is this column a hexagonal shape? How many sides does it have?
- At the “top” of the column, measure the dimensions of each side of the column. Based on these measurements, make comment on the shape of the column. Is the column shape regular or irregular? Why do you think this is?
From your vantage point, look to the major cliffs to the south west.
- Describe the major layers of rock in the cliff? Your answer should provide details for each layer of the rock with regards to the height of each layer above the natural ground level at the cliff base, the colour of the rock, the rock shape, the rock texture, any patterns or striations and so on?
- Based on these observations, what do you think the rocks are in each of the major layers?
You must send your answers by email or the geocaching message to me. Once your message or email with the answers is sent, feel free to log the cache as found. I will contact you with any queries or concerns I have about the answers. Any found logs which are posted without answers being sent will be immediately deleted without notice.
Optional Photo: From the listed coordinates, there are great views to the north. Mt Gillies, the remains of the rhyolitic vent that “capped” Mt Lindesay, is located 4.2 km away to the North East. Unfortunately, it is not visible from the listed coordinates, but can be seen on the ridge line below if you are hiking via route option 2. Mt Earnest is some 3 kilometres away to the NNW, with the obvious double peaks of Mt Barney behind it. It would be great if you could include an optional photo of the view of Mt Gillies from the ridge line or Mt Ernest and Mt Barney from the listed coordinates.
Track Notes
There are two potential routes to this Earthcache. With a car shuffle or a little bit of extra walking on the Mt Lindesay Highway (please take care), it is possible to do a loop walk around the mountain.
Option 1: From the Border gate trailhead waypoint, head east and follow the border fence on a well formed maintenance track. At WP1, leave the well-formed track and head north climbing steeply on a rough footpad, which follows the original border fence, remnants of which are visible from time to time as you climb. Initially, this foot pad bashes through eucalypt forest with lantana and stinging nettle, before the vegetation changes to rainforest as you climb. Continue climbing steeply until you reach the imposing cliff face at WP2.
This waypoint is near the start of the rock climb to the summit. The summit climb should only be attempted by experienced parties with appropriate equipment and in good conditions. A number of deaths have occurred climbing to summit. Stay safe and live to cache another day!
Traverse along under the cliff face to the right, passing the larger first cave at WP3. Then, at the second smaller cave, descend down hill about 30 or 40 metres before contouring towards Vidler's waypoint. Descending at the caves avoids cliffs further along. At times, it is easier to follow the cliffs though sometimes you will need to detour up to 50 or 60 metres away from the cliff base.
In a gully at the base of “Vidler’s chimney”, you will pass the marked grave of Edwin Vidler, who fell to his death on Boxing Day in 1928 whilst attempting to climb the cliff face behind you. Continue following the bottom of the cliff face until you reach the listed coordinates at the North West corner. Here, there is a distinct change in vegetation. A magnificent view of Mt Ernest, the peaks of Mt Barney and Mt Maroon awaits as you emerge from the rainforest into open eucalypt forest.
Option 2: Start at WP 7 - National Park Boundary on the Mt Lindesay highway and follow the National Park boundary fence until you join a grassy ridge at WP6. Please note that the cleared grazing paddocks to the north west of the boundary fence are private property. Please do not trespass on this property without the owner’s permission.
From WP 6 – Ridge, climb the obvious grassy ridge steeply until a 10 metre cliff blocks your route. Traverse to the right of this cliff, cross the gully and then climb up, skirting around the right hand side of the cliff face before veering to the left and climbing a small rocky crevice. Care should be taken here. This crevice is easier to climb than descend. A rope may assist those who are not confident scramblers.
Once above this crevice, head up towards the obvious basalt columns on the skyline at the listed coordinates.
Note that there is no safe parking on Mt Lindesay Highway at the National Park Boundary.
Some words of caution
The hike up Mt Lindesay is a highly strenuous endeavour, which should not be underestimated. Please take the usual precautions for a hike of this nature, practise minimal impact bushwalking and stay safe. There is limited mobile phone coverage, which cannot be relied upon. Ensure a reliable friend or relative knows your plans before setting out. You should pack a PLB, topographic map, compass, first aid kit, food and water, some warm clothes and wet weather gear. Repellent with DEET is essential to keep the ticks and leaches at bay. I would recommend long pants and knee length gaiters to prevent incidental contact with Gympie Gympie trees and stinging nettle.
The cache is located in Mt Barney National Park, which is protected by law. All applicable QPWS rules and regulations must be complied with at all times. Please check for alerts on the Mt Barney National Park web page before setting out.
References
Goehring, L, 2008. On the scaling and ordering of columnar joints. Doctoral Thesis, University of Toronto. (https://www.physics.utoronto.ca/~nonlin/pub/goehringPhD_hires.pdf retrieved on 16/5/18)
Holland, R, 2012. Lindesay and the Volcano, Northern Rivers Geology blog. (http://nrgeology.blogspot.com.au/2012/04/lindesay-and-volcano.html retrieved on 16/5/18)
Johnson, R. W, 1989, Intraplate volcanism in eastern Australia and New Zealand, pages 112 -115, Australian Academy of Science.
Stevens, N & Willmott, W, Mount Barney to Mount Ballow, (https://www.southee.com/Geology/Barneyv5.pdf retrieved pm 16/4/18)
Columnar Basalt (https://en.wikipedia.org/wiki/Basalt#Columnar_basalt retrieved on 26/5/18)