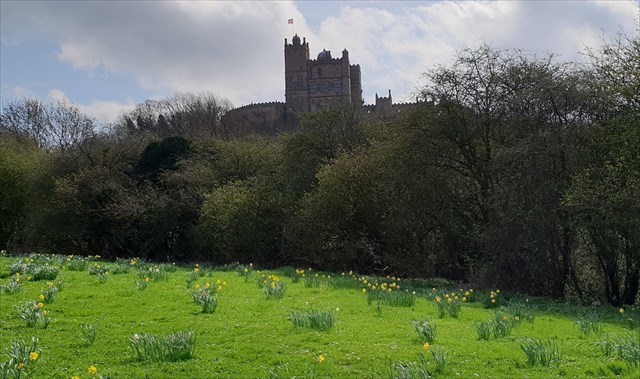
This cache is located within sight of Bolsover castle, but not at the posted coordinates. It is placed with the permissions of Derbyshire and Old Bolsover councils. To obtain the actual coordinates and find the cache you will firstly need to answer some questions posed along a virtual tour of the castle grounds. It is recommended doing this tour on a computer rather than a tablet or mobile phone as the larger screen will make the observation and navigation easier. (You do not need to actually visit the castle.)
History:
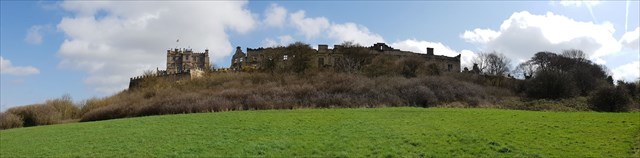
Bolsover Castle has been around largely as it is for 400 years, although the origins of the outer wall around the garden date back to medieaval times, with the original castle being founded in the late 11th century and standing for around 300 years. After more than 2 centuries of neglect the ruins of the castle became the site of the new Little Keep under the ownership of Sir Charles Cavendish. Most of the construction that you see was built between 1612 and 1687, starting with the Little Castle, wall improvements and nearby buildings, then the stables and additional buildings. Sir Charles died shortly after starting this work and it was his son William that finished overseeing the construction. The west side (State Apartments, Gallery, Dining Hall and various chambers) is largely a ruined shell with no roof or decor. The Riding House, Stables, Smithy and chambers on the south side are in better condition and still with roofs and internal floors. The Little Castle itself is also in good condition now, following on from some neglect and even a little subsidence caused by mining in the area. There are still many intricate ceilings and elaborate carvings to be seen inside, demonstrating the luxury and wealth that was portrayed by William. The walled garden and fountain are also carefully maintained and the wall around the garden with its elevated path is still standing strong and safe to walk around.
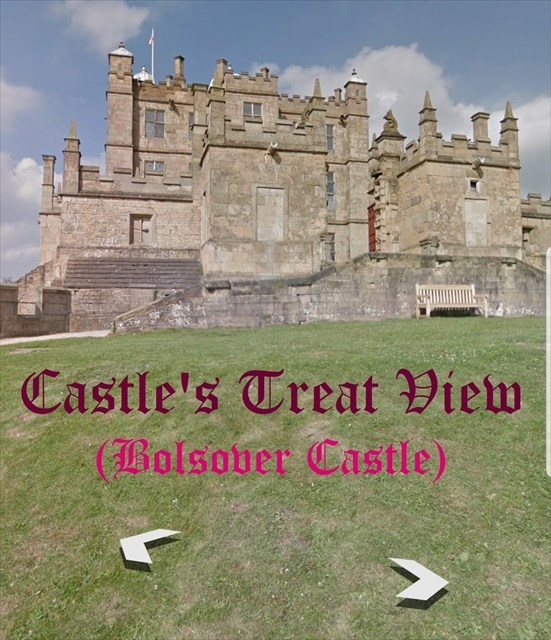
There is a charge to go into the castle grounds, but for the purpose of this cache there is no need to physically enter the grounds for either the clues or the cache retrieval.
The Virtual Tour:
The posted coordinates and the Starting Point link (below the map) will take you to the path outside the castle grounds. From here you will be able to see a walking streetview image looking towards the castle. Follow the descriptions given on the suggested route around the grounds and then every so often there will be a question about something observed at that location, with answers giving you a numerical figure needed to solve the coordinates (most are multiple choice). The final coordinates are:
N 53° AB.CDE W 1° FG.HIJ
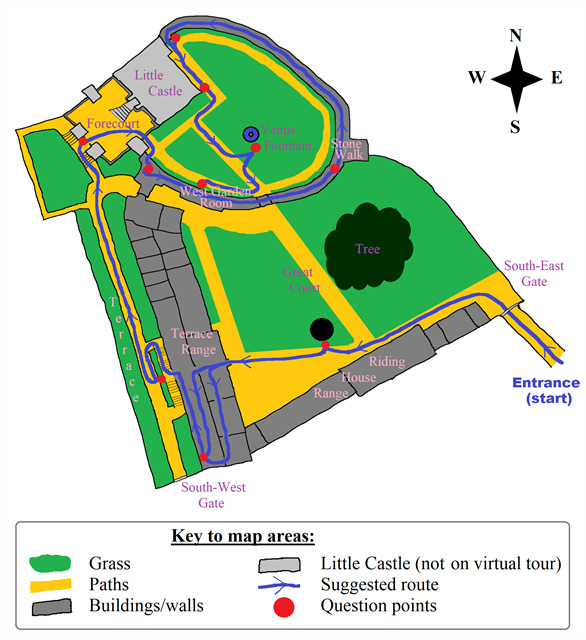
When navigating around the castle grounds on a computer (see below for touchscreen device instructions) you will need to click on arrows on the map in front of you to move forward, then use the cursor arrows or dragging the screen to spin round to the left or right. There is also the option to zoom in and out with the '+' and '-' buttons which may be required to read certain signs or look in greater detail at things when there is no option to walk any further forwards. Be aware that some arrows pointing sideways may inadvertently cause you to 'jump' through a wall and be in the wrong place. It is often possible to jump back the other way, but if you get lost in a wrong part of the grounds then you can always go back to the aerial map and drop the little person onto the relevant bit of the map if you know where you should be. The same applies if you zoom out too far and jump to an aerial view of the grounds but cannot zoom back down to ground level. I have included a sketch map of the key areas of the castle grounds and an approximate route line to help you find the way, or give you bearing of how to get back to where you were if you need to go the long way around.
Tablet & mobile navigation:
On tablets and mobile phones the arrows appear differently although sometimes clearer to see when there are multiple directions you can take, some of which may take you sideways through a wall or jumping up or down a level. The panning left or right to look around is easier with just a swipe left or right, and to zoom you need two fingers 'pinching' the screen and spreading apart to zoom in (or bringing together to zoom back out).
Once you have clicked on the start link below (which will open up streetview in another tab or window, depending on your internet browser) be sure to keep this window open for the descriptions and questions needed. To get started on your journey, click on the following web-link to transport you to the starting place, walking NNW towards the south-east gate.
CLICK HERE TO START
Walk forwards towards the gateway to the right of the Riding House. Once through the gate, turn to the left and you'll see a large courtyard (the Great Court) and paths, with a giant tree in the middle. Walk down the path towards the ruins, with the Riding House on your left and the tree on your right. Just after half way down the path there is a tent pitched on the grass to the right.
Question A: What kind of tent is this?
- Square brown tent (A = 0)
- Round white tent (A = 1)
- Round green tent (A = 2)
- Square blue tent (A = 3)
Continue walking forwards towards the ruins, past some people with a buggy. When you get up to the window you will need to 'step' through the window into the large Entrance Hall rooms, as you cannot walk through the doorway. This section of the castle buildings made up the State Apartments of the Terrace Range. Walk through as far forwards and left as you can go, into a withdrawing chamber on the south-west corner of the building in the Gallery section. In this chamber you can see a shed roof out of the window on the south wall, and if you spin round to the right you can see another window on the west wall, with a view over the land below the castle. Here you can also see the south-west gate.
Question B: What colour is this gate?
- Red (B = 3)
- Blue (B = 4)
- White (B = 5)
- Black (B = 2)
Now move north in the Gallery towards the railed-off area. There are a doorway and steps on your left which take you outside. Head down the steps and onto the Terrace Path. Look back around at the steps you have just come down and there is something underneath the middle of the steps.
Question C: What is under these steps inside the archway?
- Cannon (C = 2)
- Wishing Well (C = 4)
- Prison Bars (C = 6)
- Stone Seat (C = 8)
Head north along the Terrace Path with the ruins to your right and the wall to your left. As you get towards the end of the stretch of ruins and the path starts to bend to the right, you need to continue almost straight on (taking a left off the path) and up the steps towards the Forecourt. If you stand in just the right place at the top of the steps before going through the gate then you can see the Forecourt and further steps ahead of you, but if you look down at the floor there is a stone sign.
Question D: What is written on this stone?
- LITTLE CASTLE 6 (D = 3)
- GRAND FORECOURT 8 (D = 4)
- LITTLE CASTLE 3 (D = 5)
- GRAND FORECOURT 7 (D = 6)
Head into the Forecourt and aim for the right hand side of the steps where there is a doorway through to the Fountain Garden, a walled garden area. Take a step or two forwards through the doorway until you meet the corner of the path. Turn to your right and you'll see a stone trough and a doorway going into the wall. Head into here then turn left to face up the steps. Take a small step where the arrow points straight forward. (make sure the arrow is straight forward and not pointing off to the side or it may jump you back outside the garden at this point) Here you will land on a flat section near the top, with just 2 steps left in front of you. Turn round to the right and 'step' through the railings onto the square stone area. Turn back around to face the garden and you'll see an information board on the railings with history about the medieval castle, showing a stonemason at work. (you may need to zoom in to see this more clearly)
Question E: What is the stonemason doing?
- Sitting with a hammer and chisel (E = 1)
- Standing holding a stone above his head (E = 4)
- Bending over a stone with tools (E = 8)
- Standing on a ladder with a hammer (E = 9)
After getting the answer, zoom back out the same amount you zoomed in, then click on the arrows to the right of these railings and walk around the wall-top path going anti-clockwise around the garden area. After nearly half the way round you'll notice the path widens on the right hand side, overlooking the big tree in the courtyard where you found the first clue. Take a step to just after the end of this wider area on the right (before there are railings on the right above the Cistern House) and turn to look at the tree and courtyard on the right.
Question F: What is the grass like?
- Long, uncut meadow grass (F = 5)
- Cut in straight lines (F = 2)
- Cross-cut into square patterns (F = 8)
- Cut in circles around the tree (F = 1)
Continue along the wall path until the end where it looks like you are about to go through a door into the Little Castle. Click on the arrow pointing towards the fountain in the middle of the garden and this will 'jump' you down to the lower level. Turn back around to face the wall under the balcony where you just 'jumped' from and you will see a bush trailing up the wall in a pattern like fingers fanning out.
Question G: How many 'fingers' are there to this trailing bush? (Answer is a multiple choice option below, not the actual number, and includes all 'finger' branches with or without foliage on)
- Four (G = 7)
- Seven (G = 8)
- Nine (G = 9)
- Five (G = 0)
Turn back to face the fountain in the middle of the garden and walk forwards until you get to the end of the Little Castle wall on your right hand side. There on the floor is another stone sign. (You may need to zoom in to read this clearly on a smaller screen)
Question H: What does this stone sign say?
- LITTLE CASTLE 12 (H = 1)
- VENUS FOUNTAIN 14 (H = 3)
- FOUNTAIN GARDEN 18 (H = 0)
- WALLED GARDEN 17 (H = 2)
Continue in to the centre of the garden as close as you can get to the fountain and count up how many little stone boys there are usually peeing into the fountain, which is the same number of lions usually spitting into the fountain. (N.B. On some shots of the fountain there may not be any water but you can still count the items, or wander around it and zoom in if necessary to see a shot where the water is flowing)
Question I: How many boys OR lions are there (don't count up both)?
Answer is this number (I = number)
Walk from the fountain round to the West Garden Room, where you'll see the red door is open. (Check on the map if unsure which doorway this is). The arched doorway consists of what seems like stone pillars on either side with 6 stones per side then a pillar topper before the arched section of stones at the top. Look at the arched section of angled stones with a larger central stone at the top.
Question J: How many stones are there in total making up this arched top part above the pillar toppers (including the top middle stone and both sides)?
Answer is this number (J = number)
You are now at the end of the virtual tour and should have all the ten answers you need to solve the final coordinates. Feel free to further explore this garden or head back out past the people at the south of the garden, through the archway in the wall back to the starting courtyard, exhibition tent and huge tree.
The Cache:
The cache container is a small sized camouflaged tube hidden within the branches of a tree which is in sight of the castle, but not within the immediate grounds. There is a log sheet and small pencil inside but no space for trackables or swappables. For parking you may need to look at some of the surrounding roads in Bolsover once you can see where you are heading for the cache. The area is generally accessible by wheelchairs and buggies, although help may be needed to get to the precise cache location and retrieve it. The container is tied on to a branch with wire so can be lifted a certain amount to retrieve the contents easily, but not removed from the branch. Please ensure it is placed back with the natural camouflage of bark and twigs keeping the cache and wire covered.