The Manual on Uniform Traffic Control Devices (MUTCD) defines the standards used by road managers nationwide to install and maintain traffic control devices on all public streets, highways, bikeways, and private roads open to public travel. For this geocache, we will be taking a look at Chapter 2C of the manual, Warning Signs and Object Markers.
Have you seen signs like this while driving on the road?
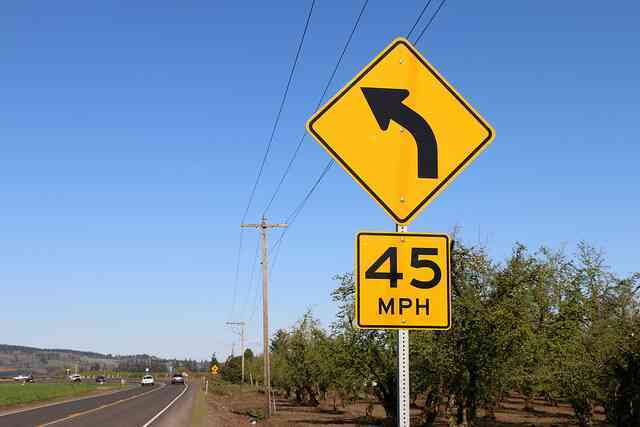

These are part of the group of signs designated for “Changes in Horizontal Alignment”, or more simply, curves. They are meant to advise drivers of a change in the roadway geometry that may not be apparent, or that requires a slower speed to safely navigate the curve. While some of the signs you can see along a route may appear haphazardly placed, the sign locations before and along a curve are meant to be determined through an engineering study, and many municipalities and state agencies are re-evaluating their roadway signs to ensure compliance with the MUTCD. To find the coordinates for this geocache, you will complete the tasks required in a curve signing process on some example roadways.
Advisory Speed
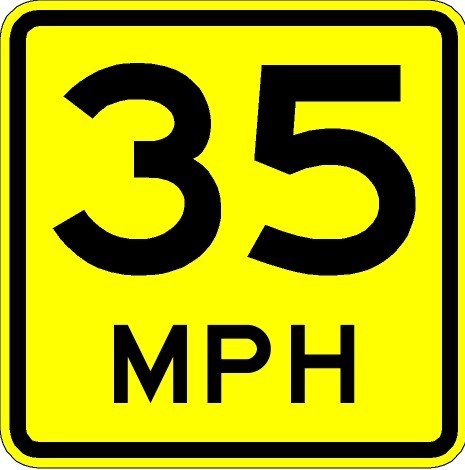
The first step in the process, after finding a roadway curve in need of warning sign treatments, is to determine the advisory speed. The advisory speed is the engineer’s recommended speed to travel through the curve safely. Roadway curves are generally given warning signs when the advisory speed is less than the posted speed limit, and an advisory speed plaque (pictured above) is required when the difference is 10 mph or greater. This speed can be determined by using an accelerometer, an equation, or a ball-bank indicator. We will look at the ball-bank indicator method for this geocache.
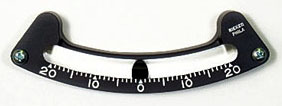
The ball-bank indicator is a device that measures lateral forces in degrees for a vehicle navigating a curve. As you drive through a curve at faster speeds, the ball is pushed outward towards the larger numbers, while slower speeds yield a smaller number. The MUTCD lays out criteria for the maximum degrees allowable on a curve given a certain speed. The criteria is as follows:
- 16 degrees of ball-bank for speeds of 20 mph or less
- 14 degrees of ball-bank for speeds of 25 to 30 mph
- 12 degrees of ball-bank for speeds of 35 mph and higher
To determine the advisory speed, the curve is driven in both directions at varying speeds in increments of 5 mph. If the ball reaches a maximum reading less than or equal to the listed criteria for a certain speed, it is a “pass”. If the ball exceeds the criteria, it is a “fail”. A pass in both directions at the same speed means you will increase your speed by 5 mph and run the test again until a fail occurs. A fail in either direction means you will decrease your speed by 5 mph and run the test again until a pass occurs in both directions. The advisory speed of a curve is the maximum speed at which driving the curve in both directions results in a pass.
Example 1: Driving north through a curve at 25 mph shows 11 degrees, and driving south shows 12 degrees. 25 mph is a pass. On the next test, you drive 30 mph. North shows 13 degrees, and south shows 15 degrees. Even though the north direction passed, the south direction failed (15>14). The maximum speed at which both directions passed is 25 mph, which is the determined advisory speed.
Example 2: Driving east through a different curve at 35 mph shows 15 degrees. This is a fail (15>12), so the next test is run at 30 mph. East shows 13 degrees, and west also shows 13 degrees. Both directions pass, and since the speed was decreased from the first test, 30 mph is the maximum safe speed.
Advance Warning Signs
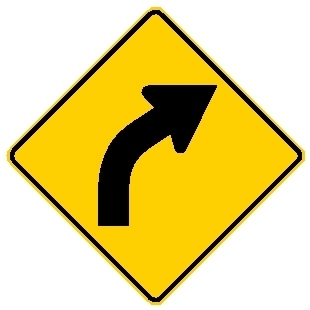
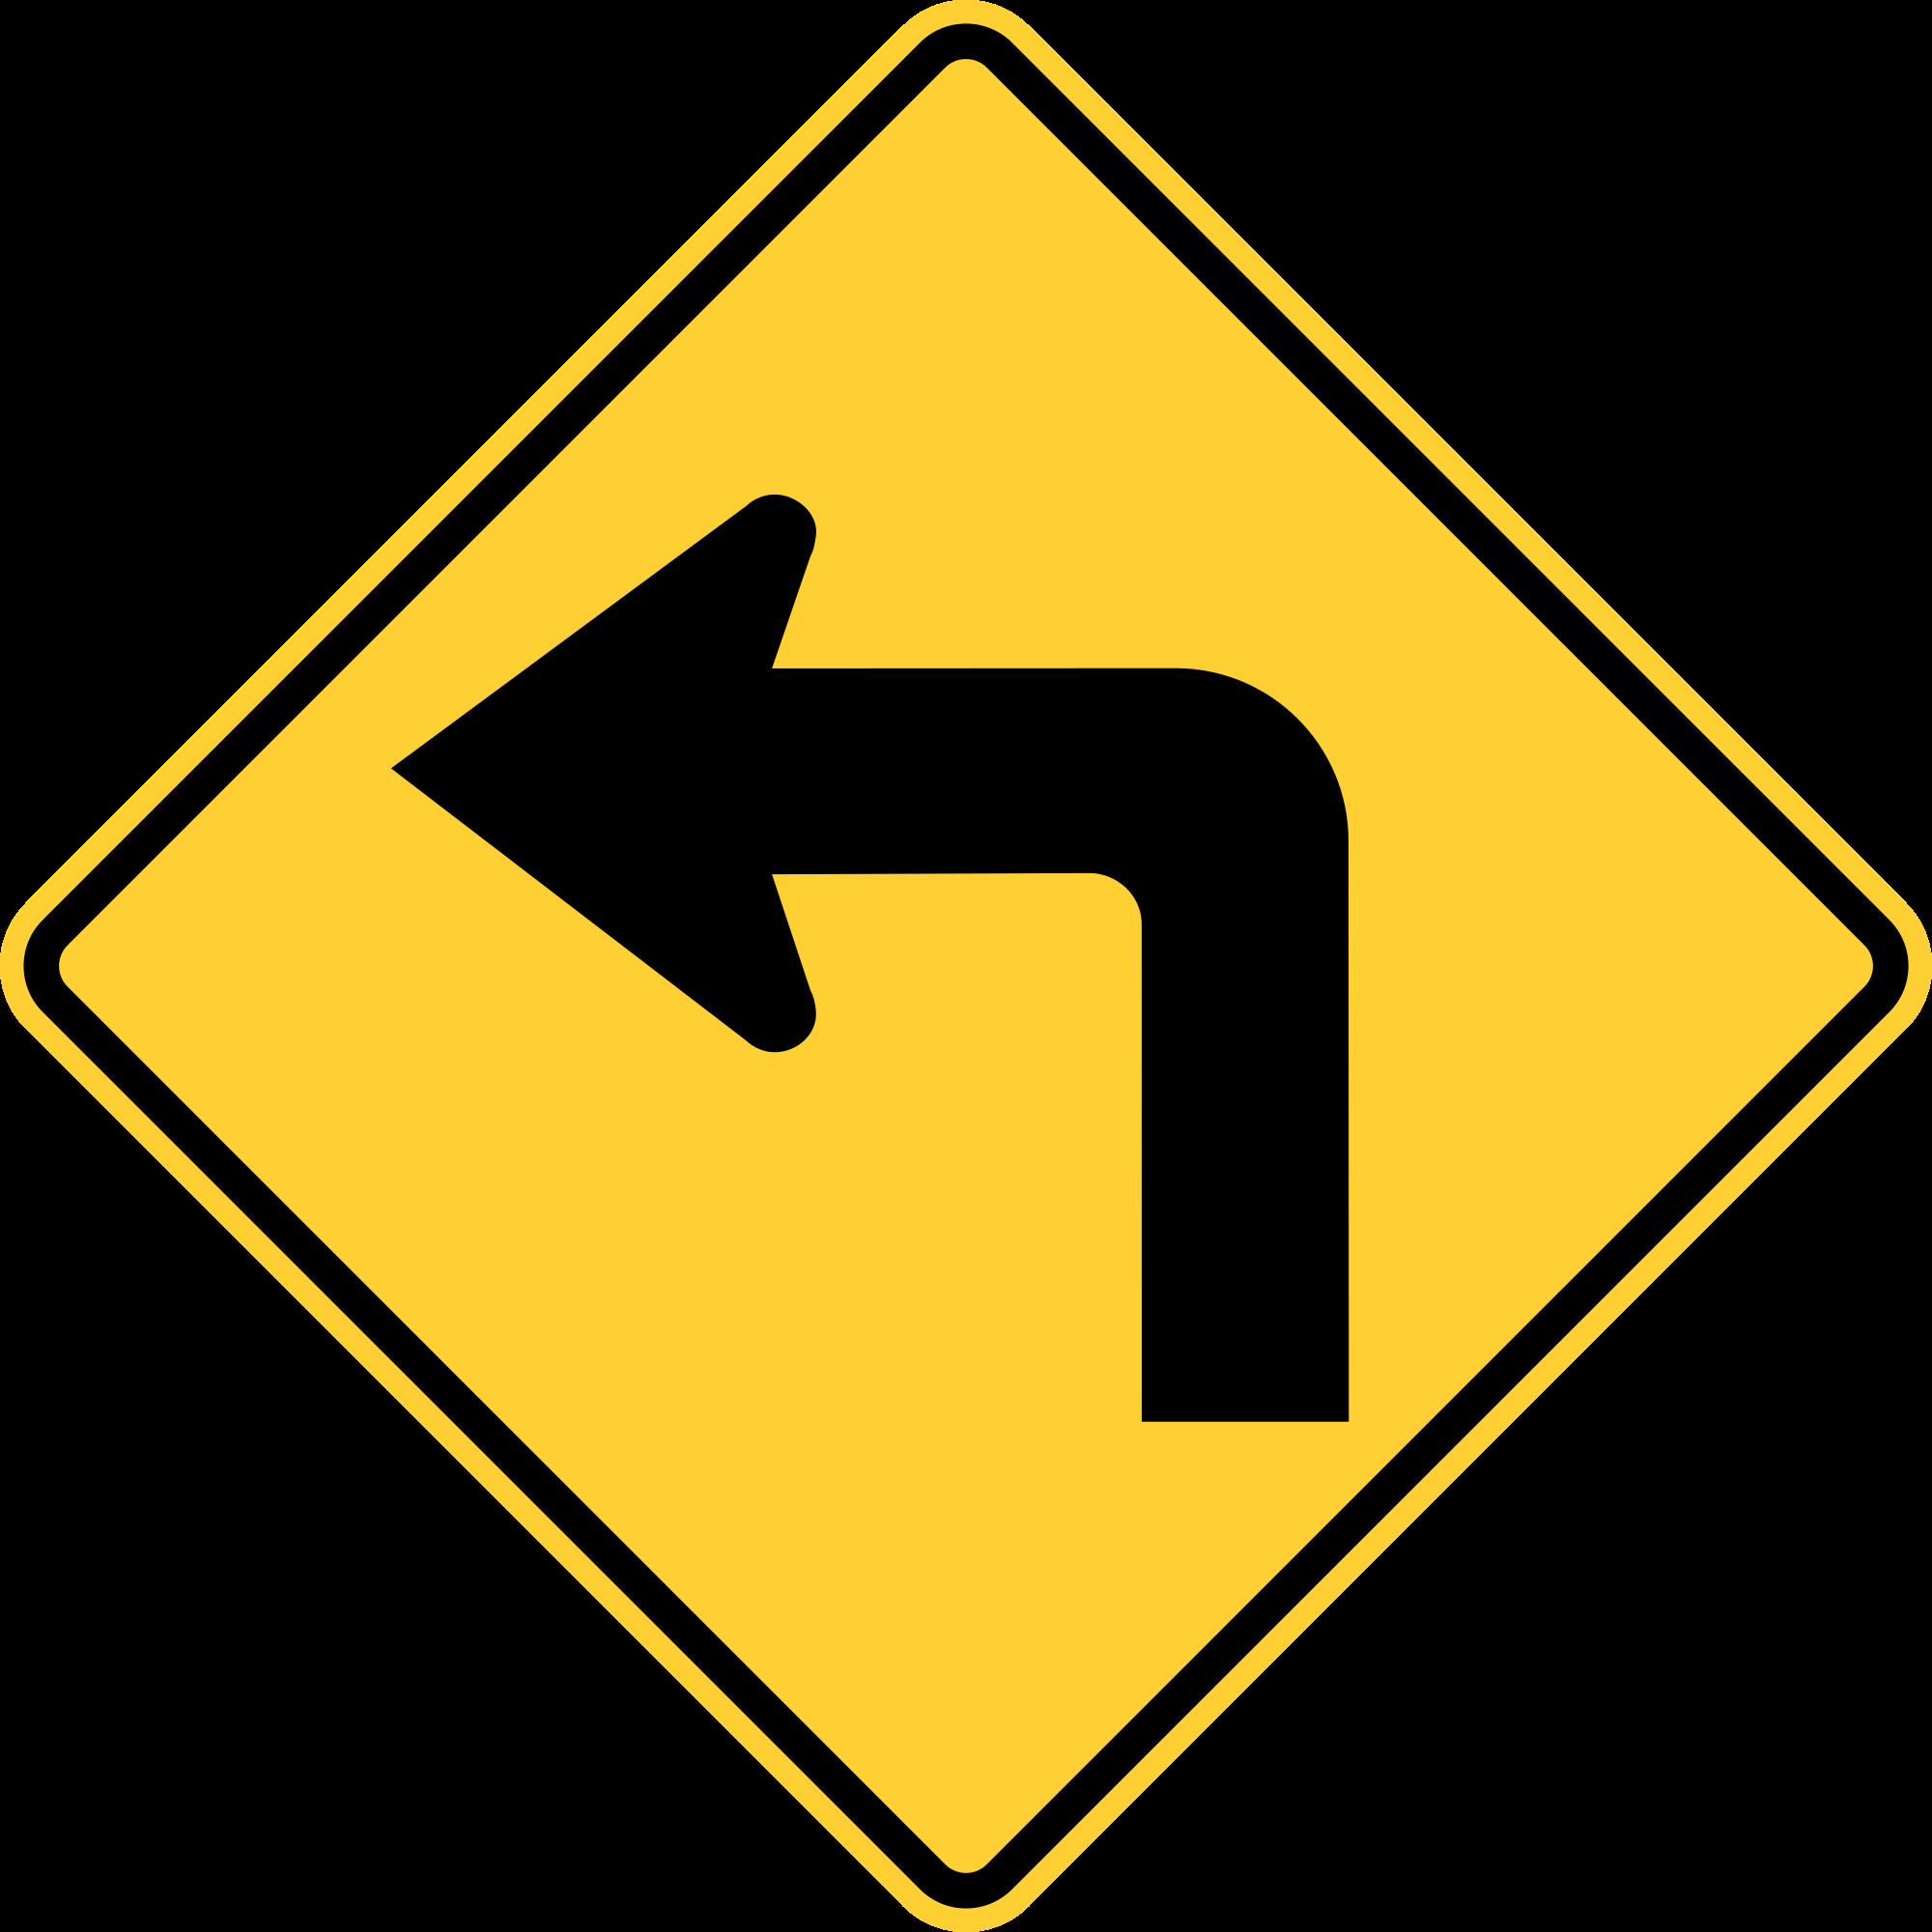
The next step in the process is to select the advance warning sign for the curve. A two-way road will have two advance warning signs - one at either end of the curve, while a one-way road will only have one. An important distinction to make here is curve (left picture) vs. turn (right picture). These do not actually represent the shape of the roadway, but rather the advisory speed. If the advisory speed is 35 mph or higher, the curve sign is used. 30 mph or lower uses the turn sign.
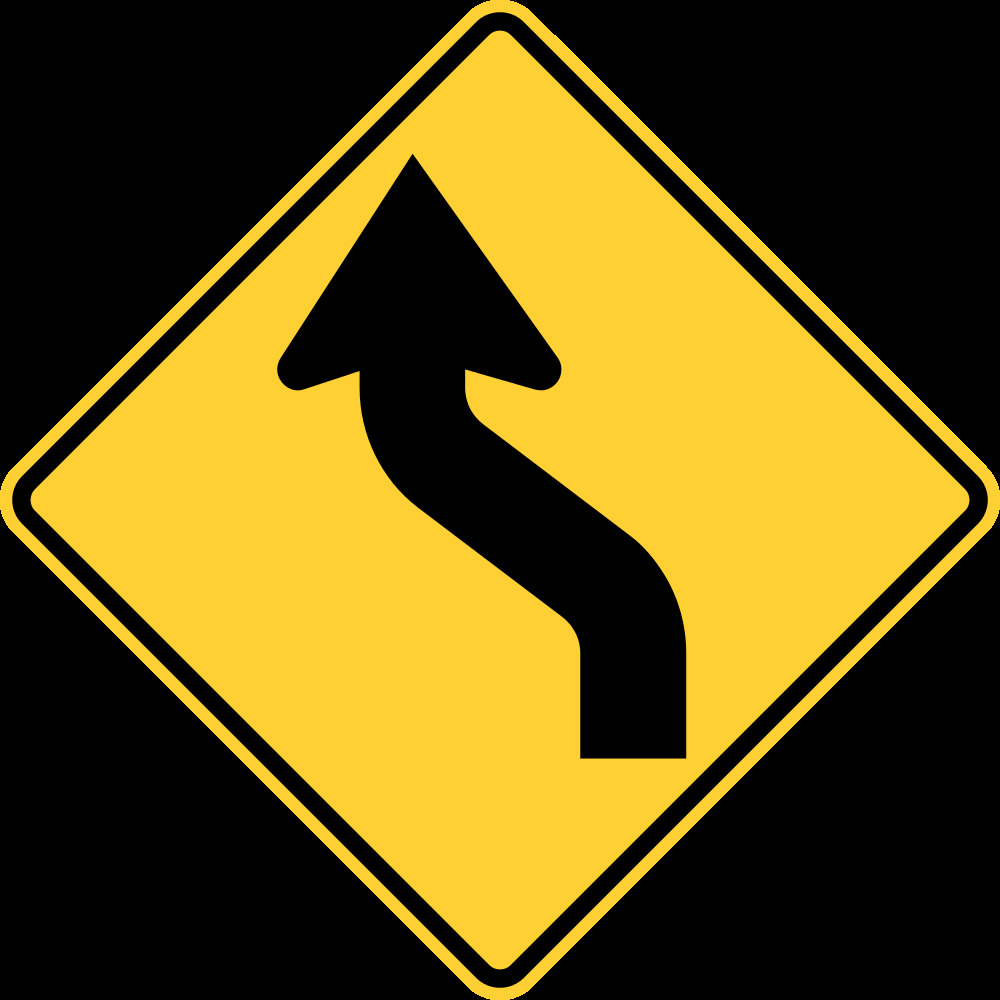
These signs above are used when two changes in roadway alignment in opposite directions occur along a roadway, separated by 600 feet or less. Just like the curve and turn signs, these are called reverse curve and reverse turn, and correspond to the same advisory speeds as above. If the two curves comprising a reverse curve/turn have different advisory speeds, the lowest one controls.

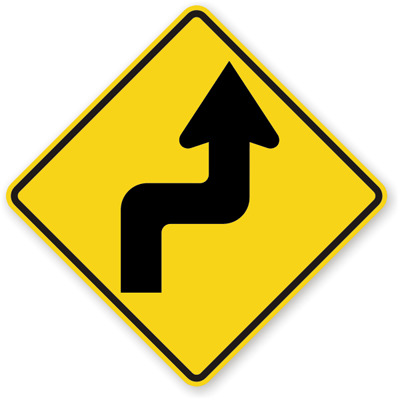
When three or more changes in roadway alignment occur, separated by 600 feet or less between each curve, the winding road sign is used. Like the reverse curve/turn, the lowest speed in the group controls.
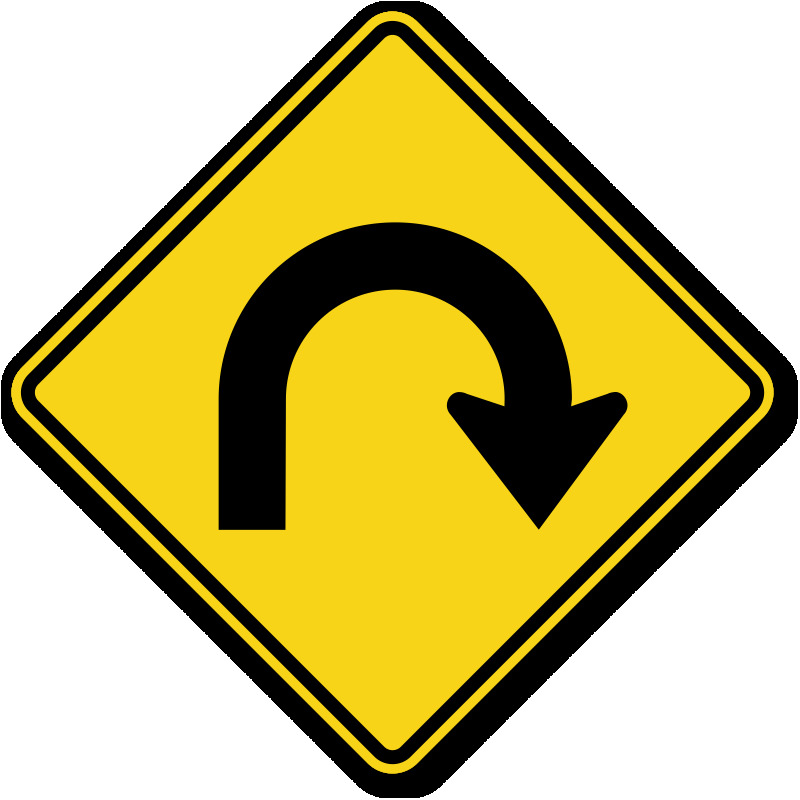
The last widely used sign is the hairpin curve. This sign is used when the curve’s deflection angle (I) is 135 degrees or more. Deflection angle can be calculated from the radius (R) and length (L) of the curve using the equation below, and should be calculated for every curve receiving sign treatments to make sure hairpin signs are used instead of curve/turn when appropriate.
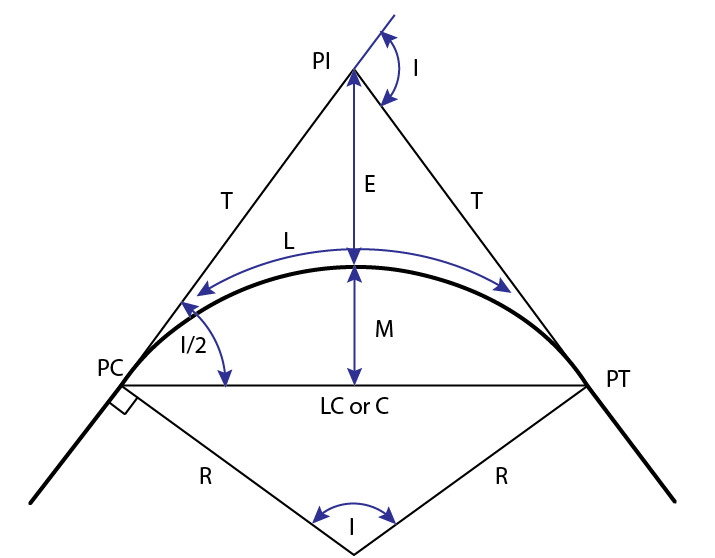 I = (180 x L) / (π x R)
Chevrons
The third step is to decide if chevrons are needed along the curve.
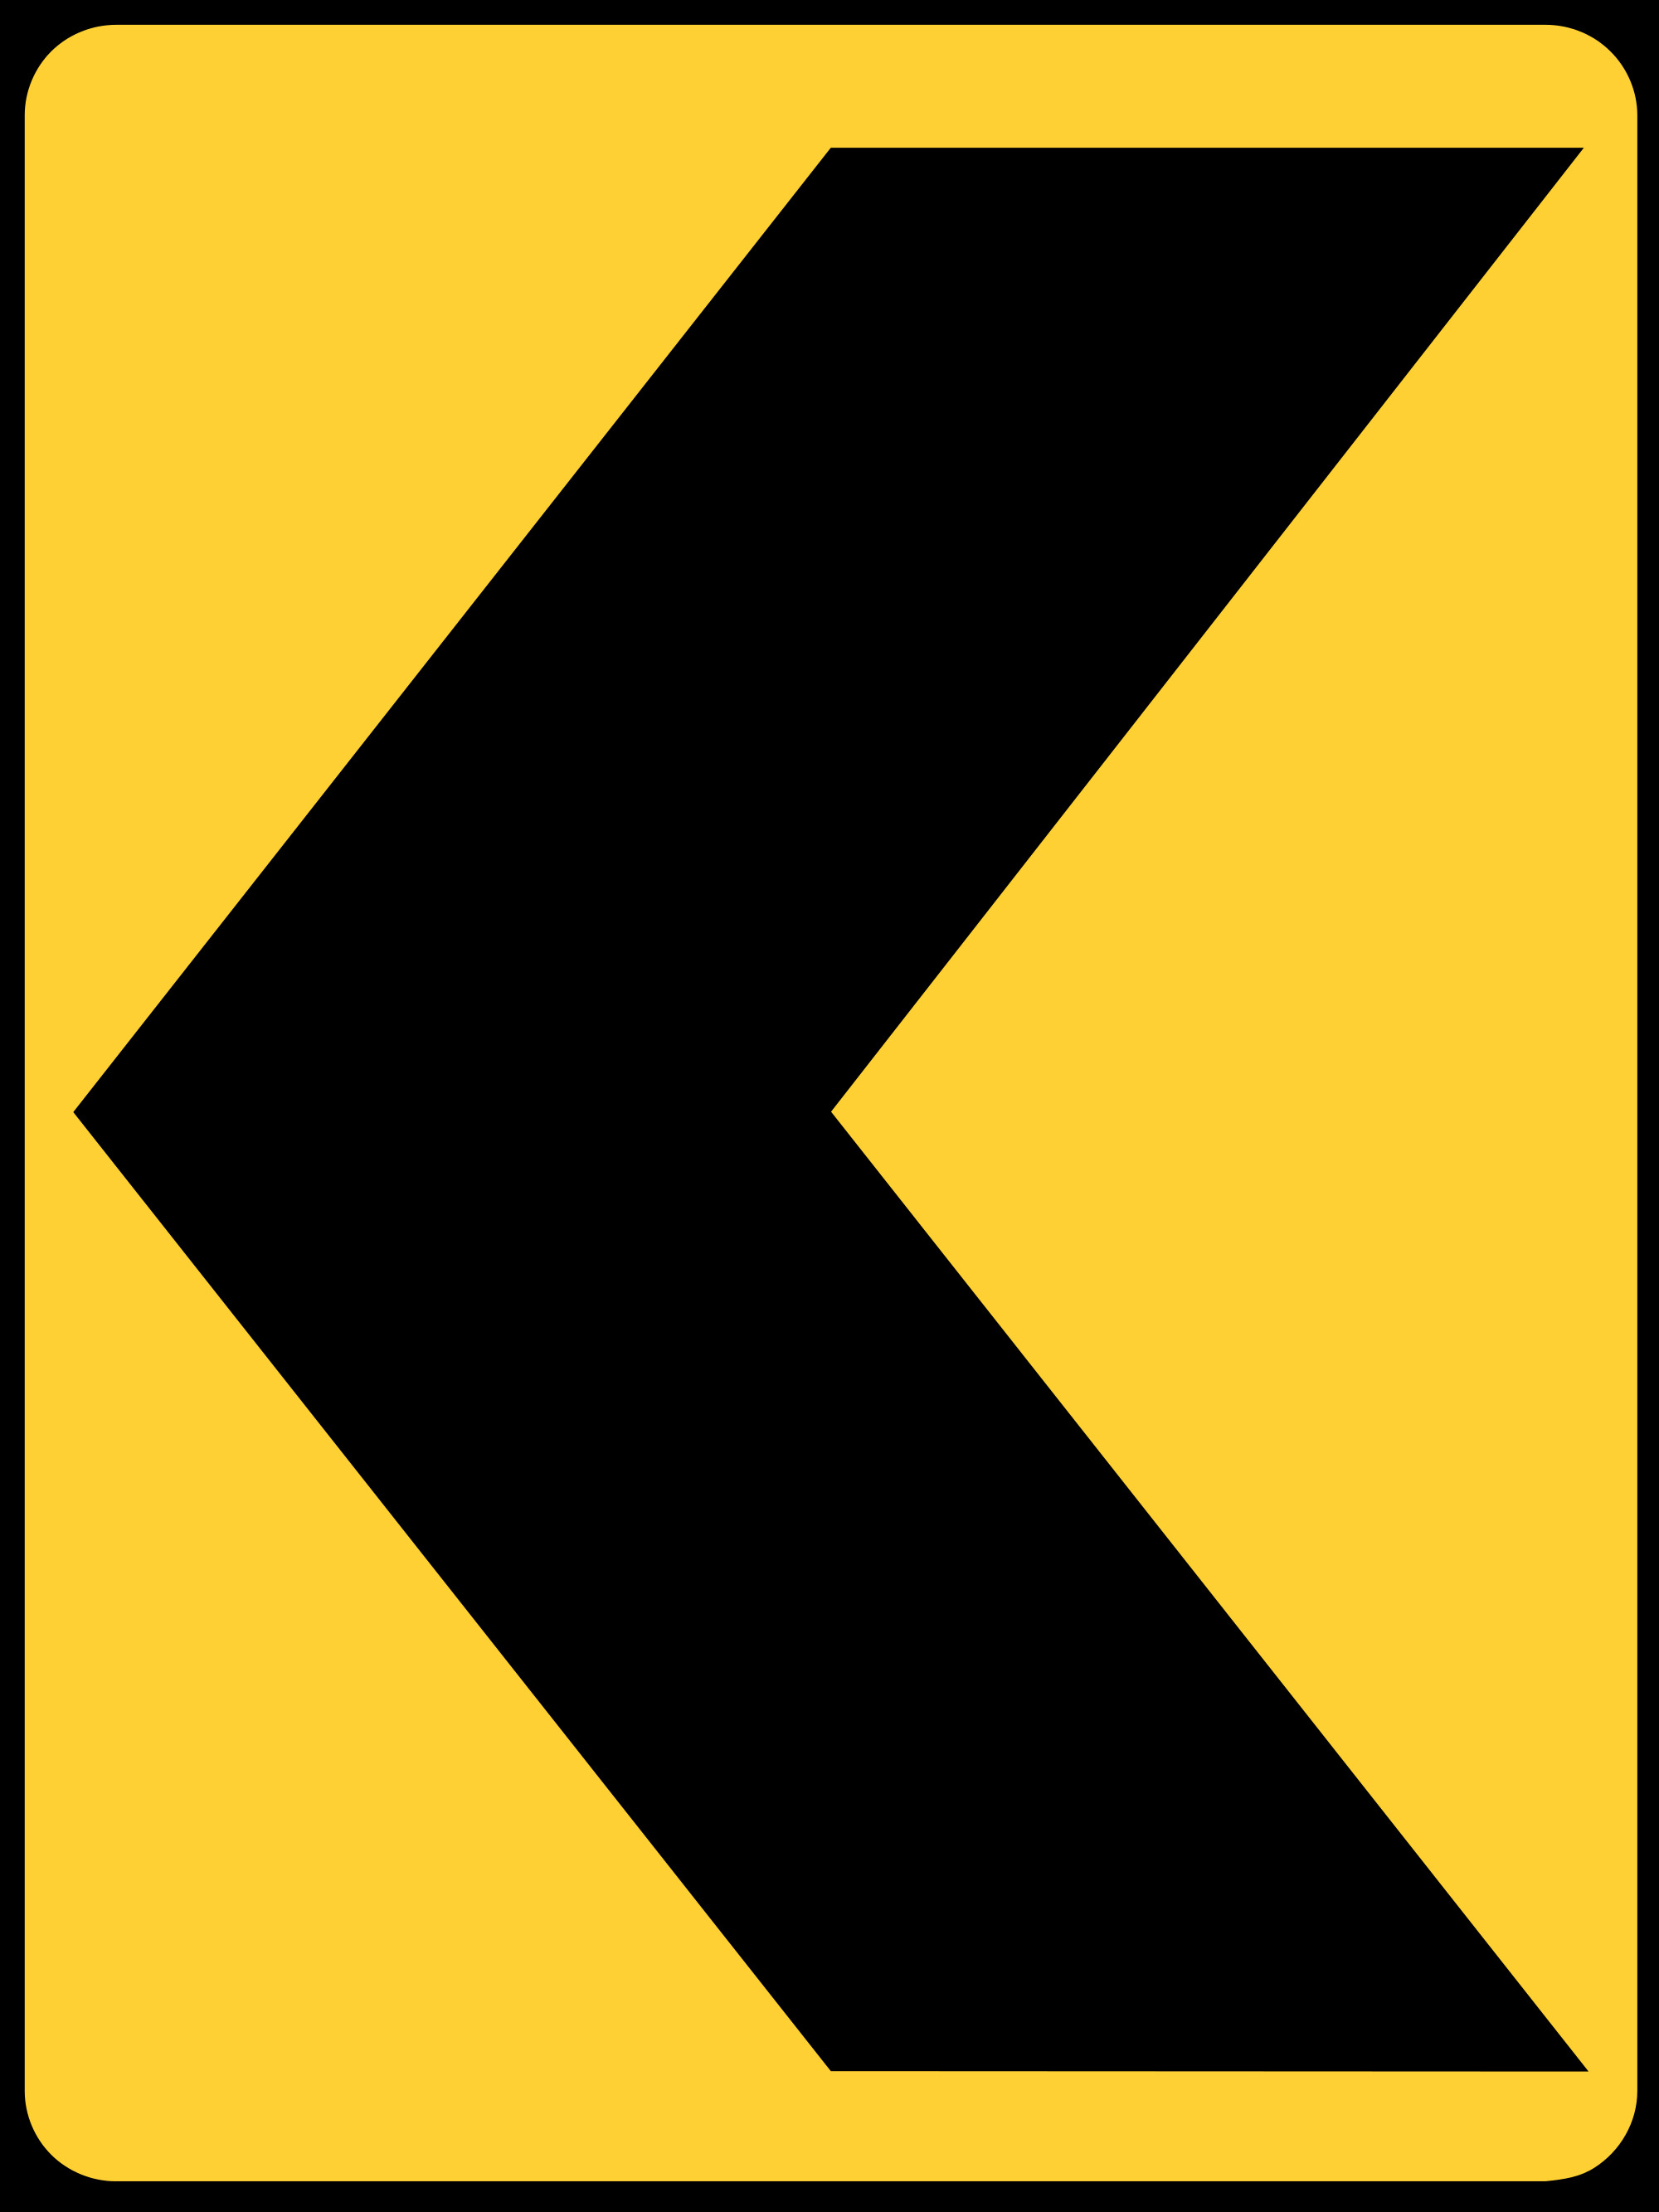
The chevron alignment sign is used to emphasize the edge of the road and provide driver guidance through the curve. Chevrons are required whenever the difference between the advisory speed and the speed limit is 15 mph or greater, and always used on hairpin curves regardless of speed.
Chevrons are spaced evenly along the curve according to MUTCD Table 2C-6 below:
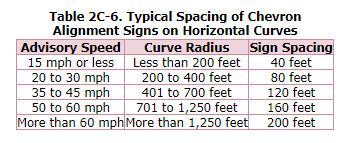
Either the advisory speed or smallest curve radius can be used to determine the spacing, but if there is a discrepancy, go with the shorter spacing for safety. Chevrons should be spaced evenly along the entire length of the curve, with one group at the very beginning (PC) and one group at the very end (PT). To determine the total number of chevron groups to use, divide the length of the curve by the spacing and add 1. For example, a 320-foot long curve that requires 40-foot spacing would need 9 chevron groups. Chevrons should be placed in groups of two, back-to-back, to account for both travel directions of the road. Unless the road is one-way, such as a freeway ramp – then there is only one chevron at each spacing.
Advance Placement Distance
The last engineering step is to decide where to place the advance warning signs before the start of a curve in both directions. The advance warning sign can be a singular horizontal alignment sign, or a horizontal alignment sign with an advisory speed plaque below it. Reference the advisory speed section above to determine if a plaque is needed. The distance from the start of the curve to the sign installation is found in MUTCD Table 2C-4 below, where the leftmost column is the posted speed limit, and the top row of Condition B is the advisory speed:

Note: if the advisory speed ends in 5 instead of 0, round down for safety. For example, a 25 mph advisory speed would use the 20 mph column in Condition B.
Additional note: If your distance is determined to be “N/A”, use 100 feet as a standard.
Sign Area
Finally, the sizes of the signs must be provided to the sign installer. Sign sizes are correlated to the road classification: single lane (one lane in either direction), multi-lane (more than one lane in either direction, but not a highway), expressway, and freeway. As the number of lanes and speed increase, so do the sign sizes. This information can be found in MUTCD Table 2C-2, linked due to large size:
https://mutcd.fhwa.dot.gov/htm/2009/part2/part2c.htm#table2C02
The sizes in this table are provided in inches, however, most sign installers will prefer to have the total amount of signage provided in square feet. For example, a 36 x 36 sign would be 9 SF. And this is the total area for ALL signs on the curve - advance warning, advisory speed plaque, and chevrons if applicable. Hint: the advance warning and advisory speed signs are separate signs - the "combination horizontal alignment / advisory speed" sign is totally different and not used in this puzzle.
You have now learned the process that goes into making a roadway curve safer. Curve signing is a low-cost safety measure, and can provide up to a 30% reduction in crashes, making this an attractive solution to transportation agencies. Now it’s your turn to work through some curve signing examples in order to get the geocache coordinates. Disclaimer: Curve pictures are not to scale.
CURVE #1
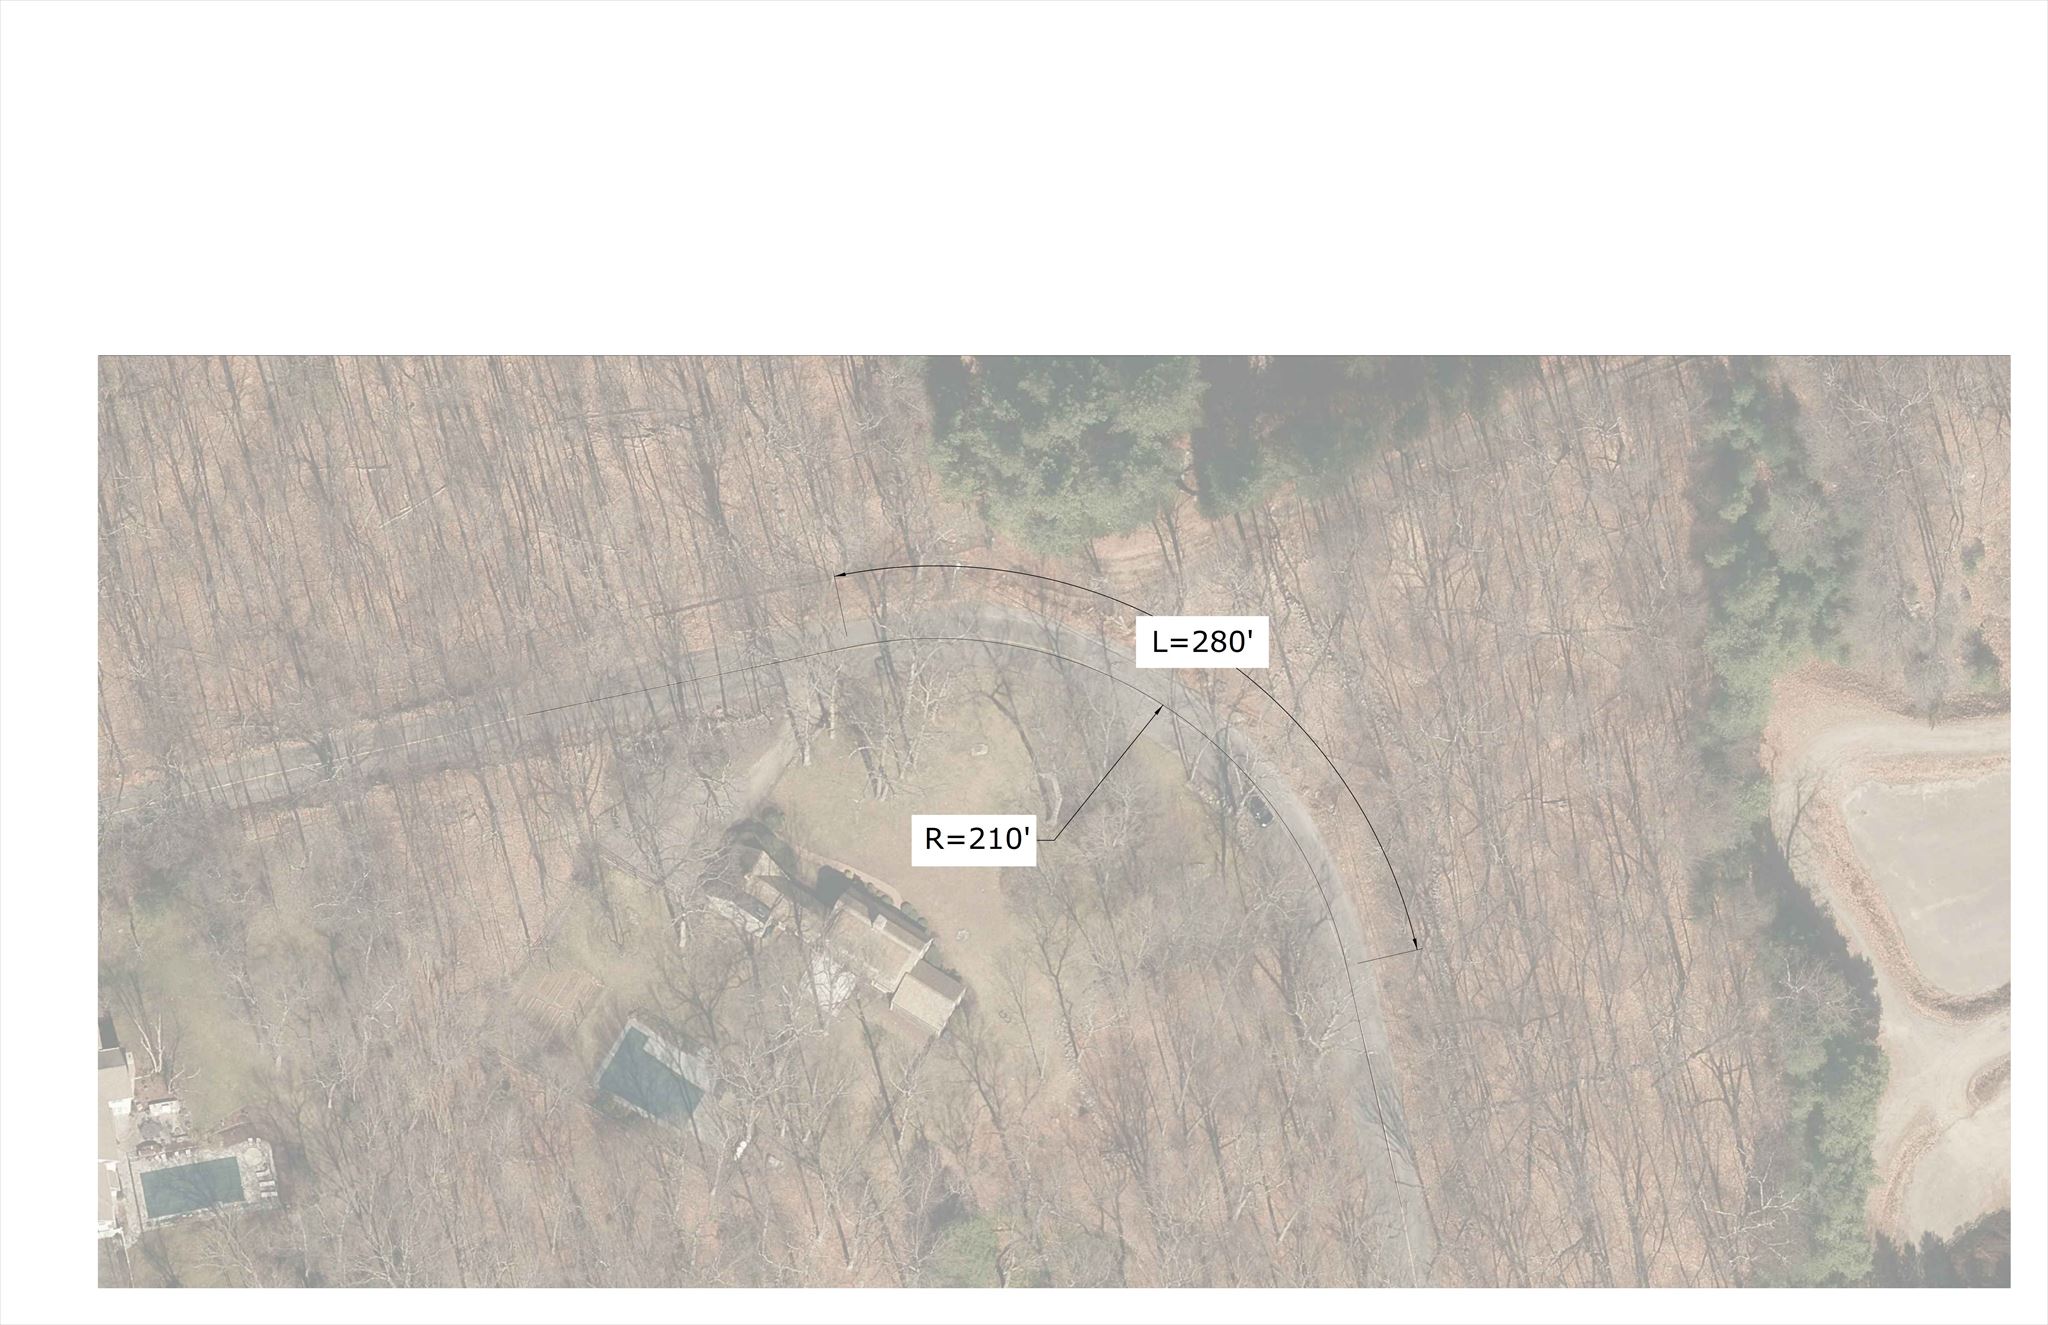
A single-lane roadway curve has a speed limit of 30 mph, a length of 280’, and a radius of 210’. The ball-bank indicator readings are as follows:
30 mph: 20 and 19
25 mph: 19 and 19
20 mph: 18 and 16
15 mph: 16 and 15
10 mph: 14 and 14
Find the advisory speed, deflection angle (rounded to the nearest whole number), required advance warning signs, chevron spacing and number of chevrons (if applicable), advance warning sign placement distance, and total sign area in square feet.
CURVE #2

A multi-lane roadway curve has a speed limit of 40 mph, a length of 400’, and a radius of 530’. The ball-bank indicator readings are as follows:
40 mph: 14 and 13
35 mph: 12 and 12
30 mph: 11 and 10
25 mph: 9 and 7
Find the advisory speed, deflection angle (rounded to the nearest whole number), required advance warning signs, chevron spacing and number of chevrons (if applicable), advance warning sign placement distance, and total sign area in square feet.
CURVE #3
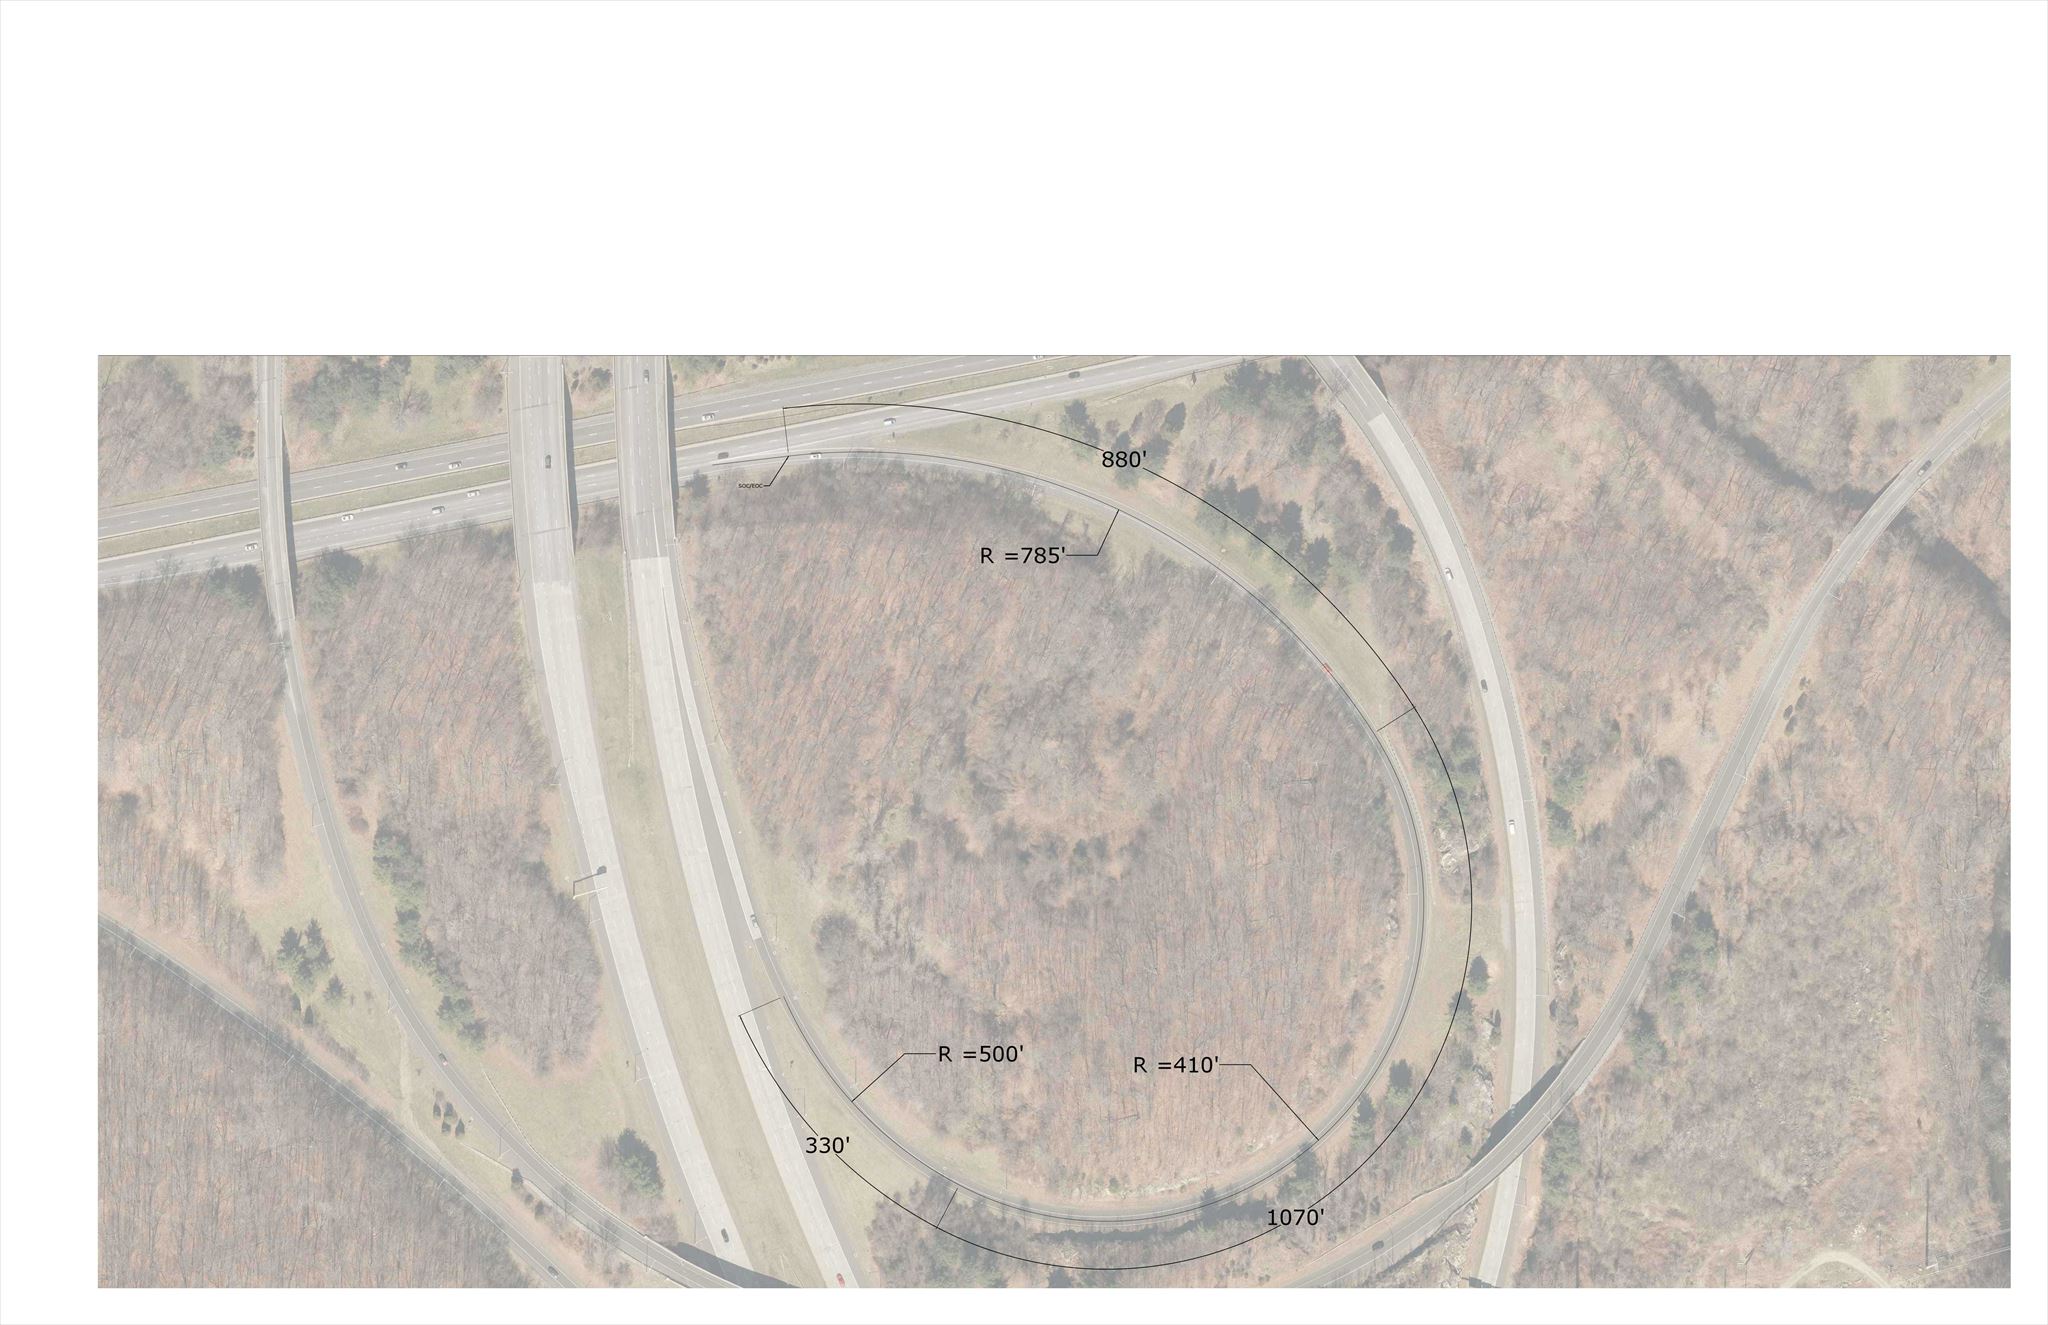
A freeway ramp has a speed limit of 55 mph, and is comprised of 3 distinct radii. The entire ramp is still treated as one continuous curve. This is called a compound curve. The ball-bank indicator readings are as follows:
55 mph: 17
50 mph: 14
45 mph: 11
40 mph: 9
35 mph: 7
30 mph: 6
Find the advisory speed, deflection angle (rounded to the nearest whole number), required advance warning signs, chevron spacing and number of chevrons (if applicable), advance warning sign placement distance, and total sign area in square feet. (Hint: calculate each curve’s deflection angle separately, round them, then add them together.)
The final geocache coordinates are in the form:
N 41 AA.BBB
W 073 XX.YYY
AA:
3 curves along a roadway are separated by distances of 550 feet and 300 feet. Which sign would be posted before the beginning of the first curve?
Winding Road (AA = 17)
Reverse Curve/Turn (AA = 18)
BBB:
Add together the total deflection angles for Curves 1,2, and 3, the total advance placement distances for Curves 1,2, and 3, and the answer to this question:
2 curves along a roadway are separated by 490 feet. The first curve has an advisory speed of 35 mph, and the second curve has an advisory speed of 30 mph. Which signs are to be placed in advance of the curves?
Reverse Curve and 30 mph plaque (add 280)
Reverse Curve and 35 mph plaque (add 92)
Reverse Turn and 30 mph plaque (add 247)
Reverse Turn and 35 mph plaque (add 178)
XX:
A curve that requires chevrons has an advisory speed of 25 mph and a radius of 470 feet. What is the chevron spacing?
80 feet (XX = 02)
120 feet (XX = 01)
YYY:
Add together the total sign area for Curves 1,2, and 3 in square feet, and the answer to this question:
Which horizontal alignment signs are used for Curves 1,2, and 3, respectively?
Hairpin, Curve, Curve (add 140.75)
Turn, Curve, Hairpin (subtract 246.25)
Turn, Turn, Hairpin (add 34.50)
Curve, Curve, Hairpin (subtract 86.25)
Please message me with any questions, or if you just want to learn more about this process! This is one of the projects I work on as a transportation engineer, and I would be more than happy to help you out with this puzzle.