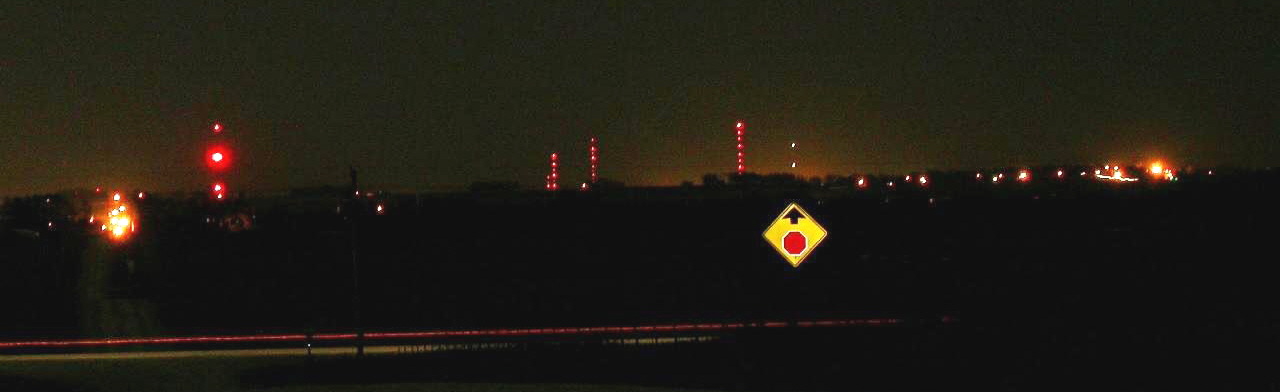
I named this cache “The Flash Lag Effect” because I believe that
that is the phenomenon that I observe while looking at various
stroboscopic radio towers like the white radio tower used in this
cache sequence: namely the one pointed to by the stop sign arrow
shown to the left here. My son (geocacher Lycan) and I are the only
two people I am aware of that purposefully look for this strange
looking occurrence in the radio towers that sprout up across the
countryside. It’s only visible when a person moves their eyes –or
their whole heads– during the event. The movement spreads the
blinking light over the field of view. Ideally moving one’s
eyeballs in what are called saccadic (jerky) movements is the best
way to go; that way you are less likely to drive off the road while
looking at towers while you roll by and other people won’t notice
what you are doing.
 Actually, for the maximum
experience my son and I go all out and wiggle our eyes very
rapidly, sometimes to the extent that we get eye strain! The
rapidly blinking lights look like a series of brilliant dots
–separated- from the tower. An extreme example of this weird
phenomenon is shown in the image to the right. The tower in
this picture is one of many like it along I-380.
Actually, for the maximum
experience my son and I go all out and wiggle our eyes very
rapidly, sometimes to the extent that we get eye strain! The
rapidly blinking lights look like a series of brilliant dots
–separated- from the tower. An extreme example of this weird
phenomenon is shown in the image to the right. The tower in
this picture is one of many like it along I-380.
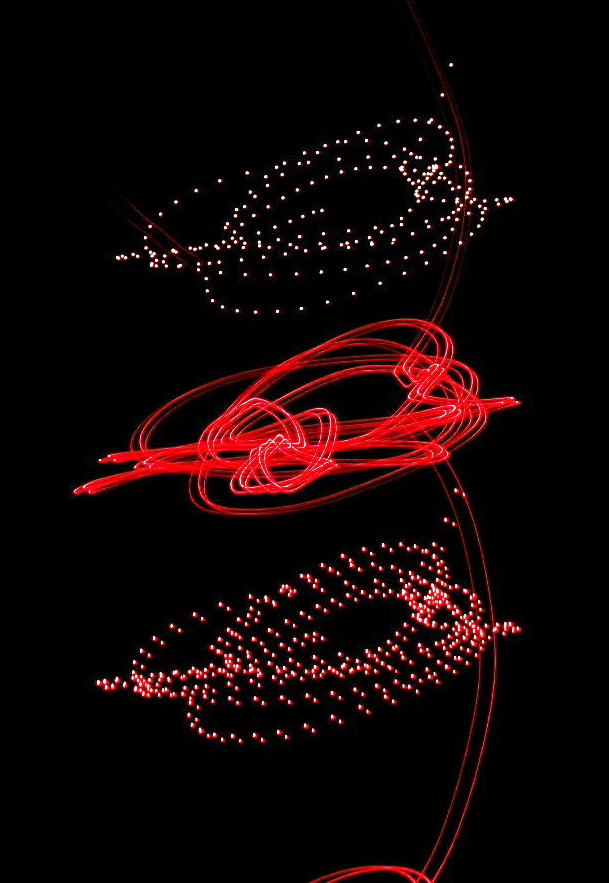 It has a
strobe-on, strobe-off time of about 2 seconds. In this image I
count more than 70 dots in the one pulse! The blinking strobe
within a strobe effect can be visualized this way:
[…….____…….____…….] where the dots represent the brief flashes
that occur during each pulse and the underscores represent the
off-times. This strobe within a pulse effect occurs only at
night. During the day the towers blink using individual
flashes that would be enormously bright if seen that way at
night. Years ago a new tower I saw must have been set up wrong
because it didn’t have the strobe/pulse mode and veritably lit
up the countryside every time it went off! I thought to myself
that that must be a real annoyance. Since then it has been
programmed to act like the others.
It has a
strobe-on, strobe-off time of about 2 seconds. In this image I
count more than 70 dots in the one pulse! The blinking strobe
within a strobe effect can be visualized this way:
[…….____…….____…….] where the dots represent the brief flashes
that occur during each pulse and the underscores represent the
off-times. This strobe within a pulse effect occurs only at
night. During the day the towers blink using individual
flashes that would be enormously bright if seen that way at
night. Years ago a new tower I saw must have been set up wrong
because it didn’t have the strobe/pulse mode and veritably lit
up the countryside every time it went off! I thought to myself
that that must be a real annoyance. Since then it has been
programmed to act like the others.
The white tower, above the arrow in
picture 1b, does not strobe
anywhere near 70 times per pulse. To see the flash lag effect for
yourself, as you approach the white tower, look past it at the
moment the lights come on. If necessary repeat this until you see a
string of dots.
For an AWESOME website that shows the flash lag effect and a lot
of other spectacular optical illusions see
this.
Following is brief summary for finding the cache. You should
print off the pictures that I have labeled 1a, 1b and 1c. You’ll
have to find two locations from where I took pictures of distant
radio towers, then you'll have to drive to those towers that are
initially in the distance. You’ll need to use your GPSr to measure
distances and to determine “back bearings”, both of which will help
you zero in on where the cache is. Finally you’ll need to find at
least one of two FireTacks. The 1st Tack is a triangular
orange-brown one. The second Tack is flat and white and in a small
depression directly above the cache.
The Meaning of Bearing and Back
Bearing
| Here is an explanation of a back
bearing. In order to understand the meaning of “back bearing”
one should begin with the meaning of “bearing.” [NOTE: I never use
bearings when hunting caches with a GPSr (only with a compass) and
only use back bearings as a part of a puzzle cache.] A bearing is
the angle around a compass: N = 0° (or 360°), E = 90°, S = 180° and
W = 270° that points directly to an object. Now here is an
example of when you could, if you wanted to, use a bearing
and a back bearing. Let’s say that you rode your mountain
bike to find a cache but had to abandon your wheels because of
dense undergrowth. Up to that point you have been working with a
GOTO to the cache. You look and see that the bearing to the cache
is 90°. That means that the cache is directly E of your position.
Before you take off you want to make sure you can find your bike
again so you make a quick waypoint for it. You find the cache then
turn back to find your bike. Now you make a GOTO BACK to
your bike’s coords. You read off the “bearing,” which at this point
is actually the back bearing back to your bike. It is
270°, directly W. A back bearing is simply the bearing back
to a point that you originated
from. |
Now if you want a shot at my “Iowa Tom’s Hall of Fame” [see the
brown table below] in the category of
“Overachiever,”
 you’ll not only need to find this
cache but you will also need to take –and post– a picture of the
white flashing tower showing only ONE series of pulses. [Paragraph
one above explains this]. To get a picture you’ll need a digital
camera that can take pictures more than 1 second long. I suspect
most digital cameras will work. Still interested? If so, read
on….
you’ll not only need to find this
cache but you will also need to take –and post– a picture of the
white flashing tower showing only ONE series of pulses. [Paragraph
one above explains this]. To get a picture you’ll need a digital
camera that can take pictures more than 1 second long. I suspect
most digital cameras will work. Still interested? If so, read
on….
The specific instructions follow.
(1) To begin with, print out the tower pictures so that they
fit on a page. To do this I copied them to a Word document and
brightened them up a bit to make them easier to study. Pictures
1a and
1b, and
1c were taken from site-1
(S1). All the telephoto images should be compared to the on site
scene by holding them farther from your eyes. That will allow you
to see the towers as I saw them in the distance. IT WILL HELP TO
KEEP THINGS IN PERSPECTIVE IF YOU USE A CLIPBOARD AND PAPER TO DRAW
A MAP OF THE TOWERS AS YOU PERCEIVE THEM. ON THE MAP YOU'LL
EVENTUALLY LABEL THE TOWERS (T) AND SITES (S) WHERE YOU DETERMINE
DISTANCES AND BACKBEARINGS: T1, S1, S2, T2, S3, AND T3. IT WOULD BE
GREAT TO DRAW LINES AND LABEL BACKBEARING ANGLES AS WELL.
When you find S1 you'll make your first waypoint that you'll
use to determine distances and backbearings. As mentioned above,
pictures
1a,
1b, and
1c are necessary to complete
your mission. Picture 1c is a blown up and cropped version of 1a.
S1 is pretty high above the Cedar Valley. To locate S1 you should
start at the
webpage coords that put you on
Ansborough in Waterloo. An annotated picture of what you will see
from the tower there is shown
here. At the webpage coord you’ll be
about 60 feet W of the red light radio tower, (tower-1 or T1)
looming large in the image I took from there. From the point where
you are parked (in the tower driveway preferably) look through the
guy-wires attached to T1. Look for the white tower (tower-2 or T2).
It's near site-2 (S2). I labeled it in the picture linked to above.
T2 is a few miles away from T1. You can just see what I am calling
tower-3 (T-3) in the picture I took from the first tower.
Study carefully the pictures 1a and 1b and 1c (linked above)
to figure out what direction you need to drive to get to S1.
Pictures 1a and 1b were taken from S1. Use the sign with the upward
pointing arrow to get an accurate alignment of the white tower;
that will guarantee you're at S1. In picture 1c it’s especially
easy to see that T1 (linked above) is just to the left of
the road. You must decide which direction you must drive from T1
to keep T1 to the left of T2, as you look back toward
them.
Once you arrive at S1, the place from which I took pictures
1a (cropped = 1c) and 1b (all linked above) get a waypoint. You
will later use that waypoint to measure two distances and two
angles (back bearings in this case). If you’re within 100 feet
of the right spot you should be OK.
(2) After you get the waypoint at S1, you will need to find
FireTack-1 (FT1) by S2. [NOTE!
S2 is actually the location of the dashboard of your car when you
are parked in the farm field entryway near FT1.] The tack is about
6-feet up on the west side of a sign post just south of a road
you’ll drive on. To find that tack (use a flashlight to add to the
fun), first locate the driveway that leads to T2. Now zero your
odometer. Drive clockwise, using the paved roads closest to the
tower. If you want help with locating S2 use
this map. The odometer should
read just under 0.5 miles when you pass the sign with the tack
(it’ll be on your right). Park on the field entryway at S2. 15 feet
east of the Tack. Determine the distance (D1) and the back bearing
(BB1) from S2back to S1. Record your data in the appropriate
cells in tables 2 and 3 provided below.
(3) Get close enough to the sign to read and record
the second word down from the top.
(4) Convert word two (WT) to a number using the phone-pad
letter-to-number sequence shown in table-1 below. The value of all
those numbers added together is represented by WT. Simply add up
the list of letter numbers, like 2 + 8 + 5 and so on. Record
your data under WT in table-2.
(5) From S2 drive another 0.3 miles to the next field
entryway. Again, use
this map if you like. From the
second field drive S2 look for then drive to the tallest red tower
(T3) at site-3 (S3), shown in
picture-2.
That tower is the tallest of all that you will
see in its area and is a little more than 5 miles away from S2.
It’s on the other side of town.
(6) At S3 park just off the road in the driveway leading up
to the red light tower. There’s no need to approach the
tower. Determine the distance (D2) between S3 and S2 and the
back bearing (BB2) between S3 and S2 and determine the distance
(D3) between S3 and S1 and determine the back bearing (BB3) between
S3 and S1. Record your data in the appropriate cells in tables
2 and 3.
(7) Now use equation-1 in table 4 to crunch your data.
The result, BB4, is the back bearing from the cache location
back to S2! Finally use equation-2 to get the distance, D4, from
the cache back to S2.
(8) When looking for the cache, scan for fire tack-2 on a
post next to a country road. I made it so the tack is
only visible from a position that is at a right angle to the
direction you will be traveling. When you find it, pull
completely off the road. I obtained permission from the land
owner, a friend of mine. The nearest house is owned by another
friend of mine, the land owner’s cousin.
THE CACHE IS 7.12 MILES FROM
S3! There are quite a few roads that intersect a
circle with that radius. Good luck in finding it without doing the
footwork, or should I say, wheel work.
Table-1 for the Second Word to Number
Conversion
| ABC |
DEF |
GHI |
JKL |
MNO |
PQRS |
TUV |
WXYZ |
| 2 |
3 |
4 |
5 |
6 |
7 |
8 |
9 |
Table-2 for Distances
| D1, miles S2 to S1 |
D2, miles S3 to S2 |
D3, miles S3 to S1 |
D4, miles cache to S2 |
WT, number for word |
| D1 = [________] |
D2 = [________] |
D3 = [________] |
D4 = [________miles ] |
WT = [________] |
Table-3 for the Back Bearings
| BB1, S2 to S1 |
BB2, S3 to S2 |
BB3, S3 to S1 |
BB4, cache to S2 |
| BB1 = [________] |
BB2 = [________] |
BB3 = [___________] |
BB4 =
[________°] |
Table-4 for the Equations
| Equations 1 and 2 calculate the back bearing (BB4) and the
distance (D4) from the cache to S2 |
| Equation-1 |
| BB4 = (D1 + D2 + D3 + WT + ((BB1 + BB2 + BB3) ÷ 10) ÷
1.307 |
| Equation-2 |
| D4 = BB4 ÷ 37.97 |
Iowa Tom’s
Geocacher Hall of Fame
| FTF
(obsessive) |
STF
(compulsive) |
TTF (simply
bored) |
Overachieved by
successfully photographing tower-2 |
| ricann!
|
TheLeopolds!
|
 Squeamish! Squeamish!
|
 ricann, TheLeopolds and
TeamTrapper! ricann, TheLeopolds and
TeamTrapper!
|
Here is a
cool link that tells us how
far away one's horizon is. I just discovered on 9/23/09.