Some History
In the 1850s demand for land settlement in Victoria exploded, prompting Surveyor General Charles Ligar to press for a major survey to mark out the new colony and hasten the allocation of Crown land. The stated objective was to trace geographical meridians and parallels of latitude and mark 1/10 degree increments for eventual subdivision. In many areas such straight lines could be cleared and marked on the ground using primarily astronomical measurements. In others, particularly in the east of the state, mountainous terrain made the placement of regularly spaced ground markers impractical. In such areas triangulation — the calculation of distances from the three angles of triangles measured by theodolite from hilltop to hilltop — promised more rapid measurements.
Robert Ellery, then director of Williamstown Observatory, was appointed to oversee this first geodetic survey of Victoria, successfully establishing an accurate statewide network of survey markers for use as the basis for subsequent local surveys.
Field work commenced in September 1858 with the tracing of a chief meridian, at 145° east, running from Port Philip to Murray River, the southern end of which was determined by triangulation from the Observatory. In January 1860 an enduring 5 mile baseline was created in support of ongoing triangulation, running westwards from present day Hoppers Crossing railway station: a straight line on the plains, of a precisely-measured length, from which all subsequent distances could be calculated. (The Hoppers Crossing base stone is preserved on public land to this day but is not terribly accessible.)
The whole survey took a further 12 years to complete, several teams of surveyors establishing survey marks and triangulation stations across the breadth of the state and determining their precise locations through a chain of measurements of angles. Surveying the wooded slopes of the north-east in particular took immense time and effort, heliotropes being carried to high altitudes to reflect sunlight from peak to peak. The survey concluded in 1872 with the delineation of the NSW border east of the Murray River's source.
The Task at Hand
Triangulation stations are some of the most conspicuous remaining relics of this era. They varied in their construction, but in mountainous areas typically involved a stone cairn, in part for the elevation of surveying instruments clear of vegetation.
Few large survey structures placed in the greater Melbourne area in the original survey period remain substantially intact some 150 years later. Your ultimate task upon leaving waypoint A is to visit the three most intact.
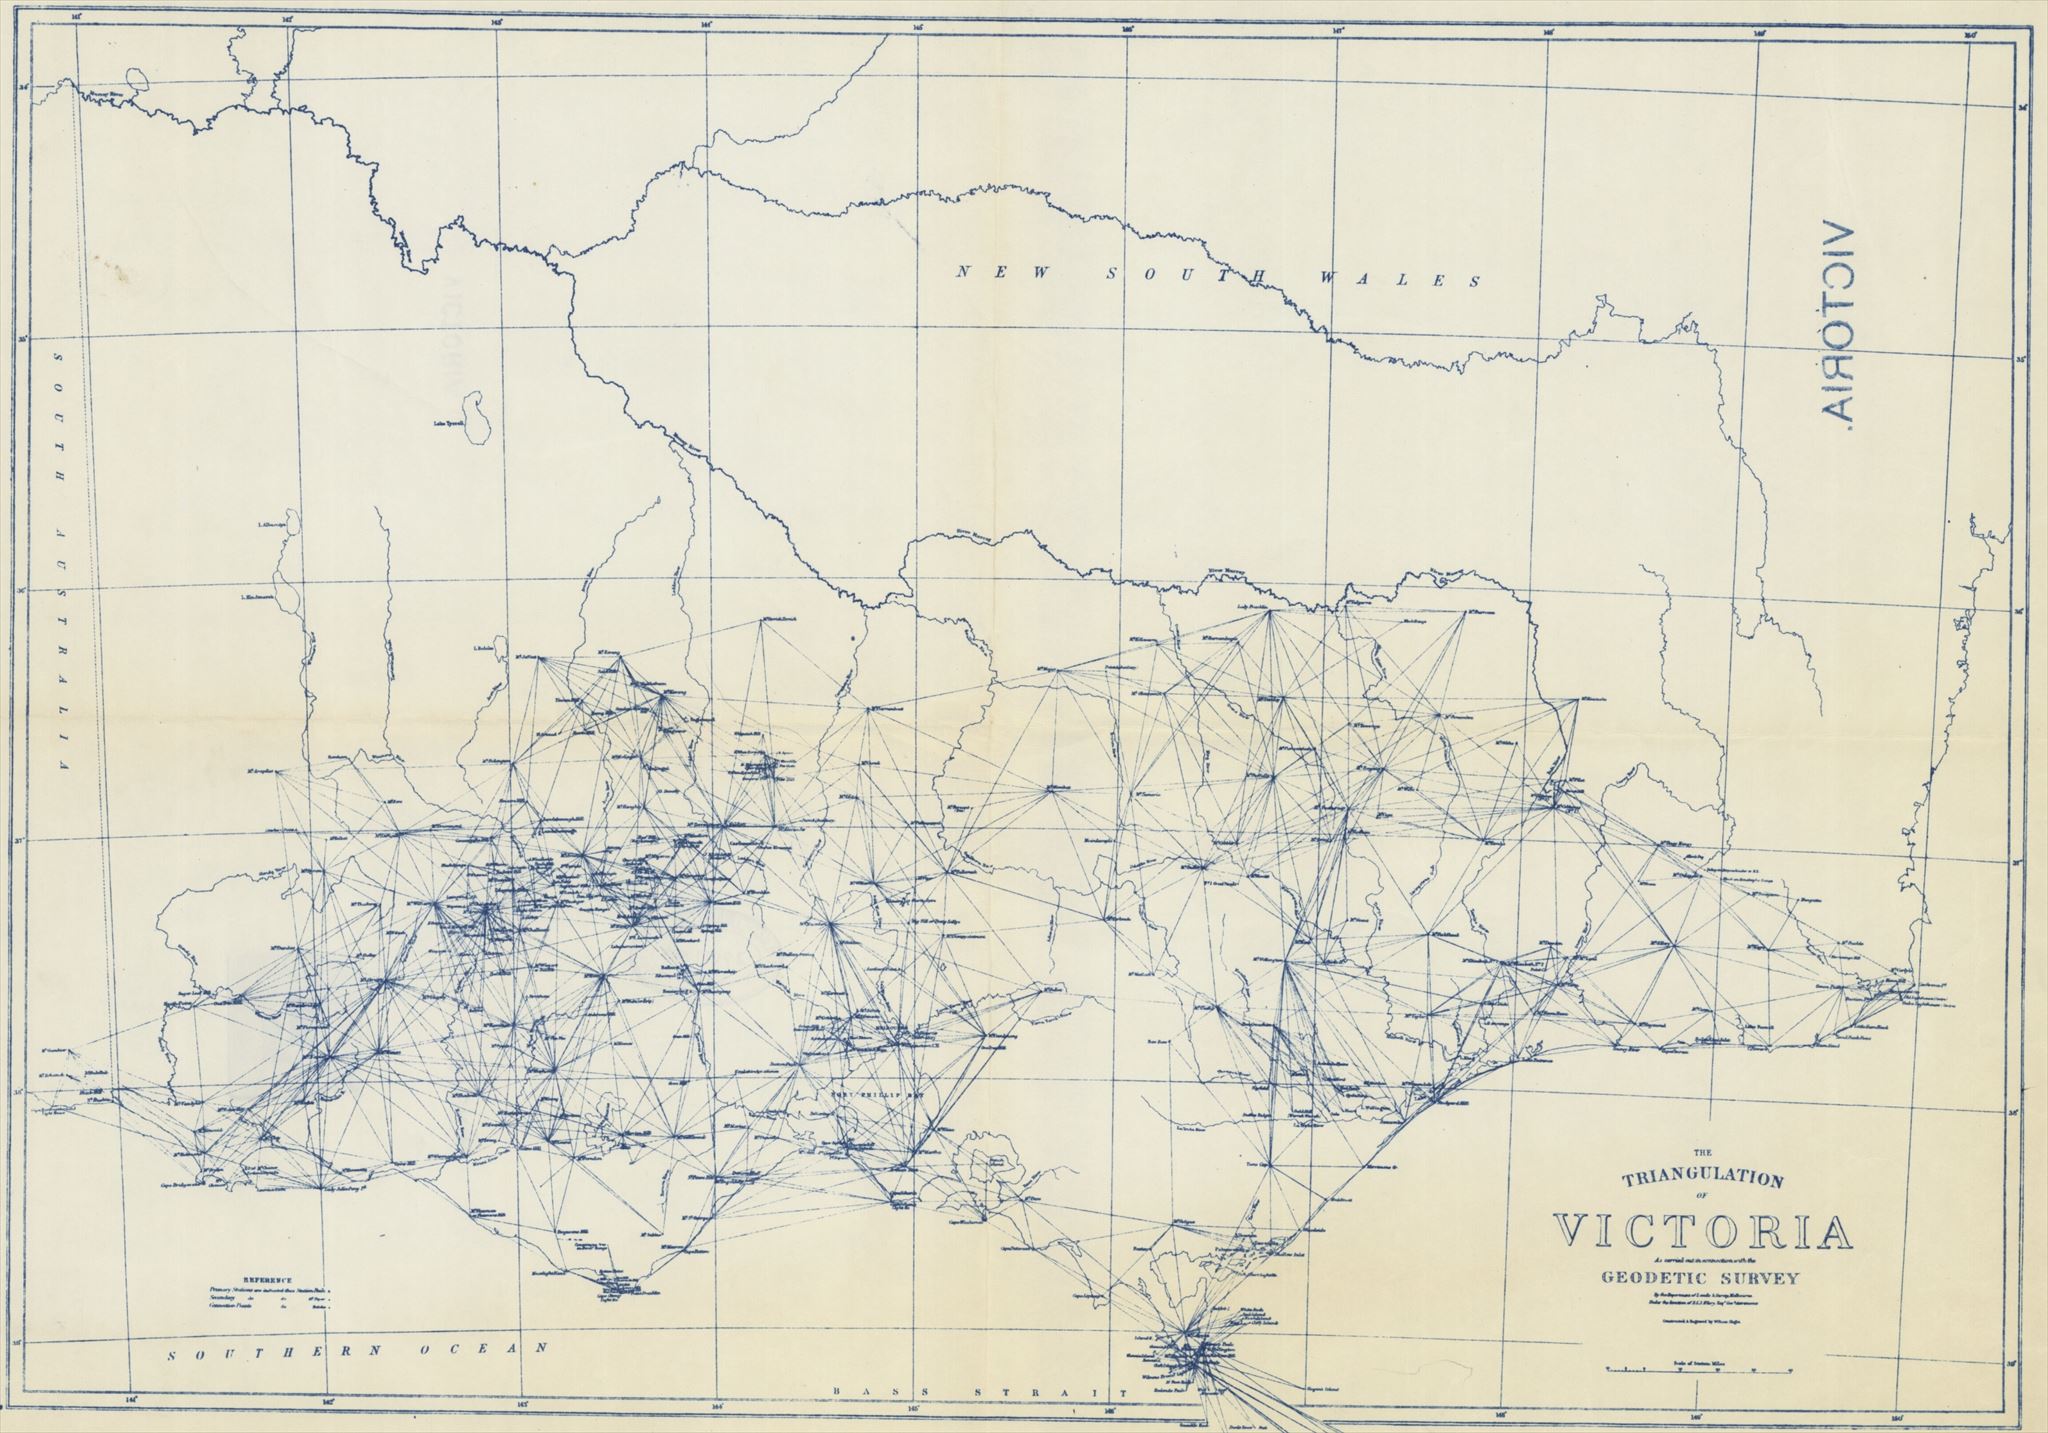
The extent of triangulation as summarised in 1912
Waypoint A
The published coordinates put you at the base of a timeball tower, which in the 1850s served as Williamstown lighthouse. In its shadow was Williamstown Observatory, the colony's first. The historical signage here emphasises the site's importance to maritime navigation (eloquently explained here by Robmc) but the now mostly demolished complex was also effectively the headquarters of the geodetic survey at its commencement. The observatory was at the centre of Robert Ellery's astronomical observations, such that its absolute position — its latitude and longitude — was likely more accurately established than anywhere else in the colony. And the prominent lighthouse tower was, as The Argus put it in 1863, "the zero of all our trigonometrical observations", a state of affairs reflected by the abundant triangulation lines radiating from the structure on the above map.
In the mid-1860s the observatory was relocated to Melbourne's botanic garden precinct.
One enduring sign of the role of the tower in early surveying is the mark on the north corner base stone, next to the stairs. An arrow and a shallow ledge has been carved into the stone.
Logging task A
Take a photograph of the survey mark. Include yourself and your GPS if you like, but at a bare minimum the inclusion of a ludicrous sign like the one here — with your geocaching alias inserted — is requested for all waypoint photos, to confirm identity, recency and an appropriate level of enthusiasm for the geodetic survey. (If you don't love geodetic surveys you'll have to fake it!)

To determine the location of Waypoint B find an upward-facing plaque near ground level about two metres from the survey mark, and express the two full dates on it in DDMMYYYY format, including leading zeros where appropriate. Calculate the WAYPOINT B southing from the earlier date and the easting from the later date, by performing the following operations:
S     [+3][+3]° [+3][-1] . [+2][-8][-7][discard final digit]
E [+1][+3][+5]° [+0][+1] . [+3][+8][+2]
Waypoint B
You should find yourself at a facility built in the 1920s which for most of its history has itself been involved with long distance observations in its capacity as a fire lookout. This is one point from which the general locations of our final survey relics are all potentially visible. Firstly, you need to climb some steps. What you seek is not at ground level. Enjoy the view, but also attend to...
Logging task B
Locate the west-facing directional plaque (approximately west: the plaques are all oriented some 10° clockwise from cardinal bearings). Take a photo including your caching name, a portion of the west plaque and Melbourne CBD in the background. Consult this diagram for the general format required.
ALTERNATIVELY, SHOULD ACCESS BE RESTRICTED BY PANDEMIC OR MAINTENANCE MEASURES:
Approach the same coordinates and take a photograph clearly demonstrating your presence at the locked entrance of the structure described. In order to access the information needed in the following sections, determine the longest word appearing on the plaque on the bench about 15 meters east of the calculated coordinates, near the flag pole. Enter that word into Certitude to retrieve everything you need to proceed.
Now to locate our final nineteenth century relics! In the spirit of visual observation and application of geometry, you need to identify the locations of the remaining relics yourself. No triangulation here though, just simple projections.
Consult the north-facing plaque (again: approximately north). Each of waypoints C to E is conveniently represented by one of the arrows here and the locations themselves may be visible depending on weather conditions. The distances cited by the 1920s metalwork are pretty accurate for our purposes, requiring only a modest adjustment to deliver you to what you seek.
Waypoint C
• Find the arrow indicating a bearing of about 300.37047° and read the distance, c, corresponding to a certain geographical feature.
• Project a distance c + 0.342 Miles and visit this location.
• This mid-to-late-1860s replacement for a slightly older structure is very accessible and is noted for its sturdy mortared construction.
Logging task C
Take a photograph indicating your presence in front of the survey structure. Use a sign as at logging task A to indicate your identity and your barely contained enthusiasm. Take a wide shot so that the relic in question is substantially in the frame and readily identified. Be aware that, while welcomed, you are not compelled to reveal your face in the photo. However it's requested that you hold or support your sign on your person in some way. For instance, outstretched legs with ID propped between your boots would also be acceptable! Group photos are certainly fine, but the individuals present must correspond unambiguously to names logging a 'find'.
Waypoint D
• Find the arrow indicating a bearing of about 83.21087° and again read the corresponding distance, d.
• Project a distance d + 0.319 Miles and visit this location.
• This 1860s relic is the closest to waypoint B, and was reputedly visible from nearby peaks well into the twentieth century. However sight lines have now been obscured for at least half a century by heavy tree regrowth.
Logging task D
Stand in front of the survey structure and collect photographic evidence as at waypoint C.
Waypoint E
• Find the arrow indicating a bearing of about 100.57666° and read the corresponding distance, e.
• Project a distance e + 2.492 Miles and visit this location.
• This 1870 structure is the most distant from waypoint B but it represents a fairly modest, pleasant hike from the nearest road.
Logging task E
Stand in front of the survey structure and collect photographic evidence as at waypoint C.
And then you're done!
Logging
You are free to immediately log a find upon submitting a message via message centre, internal web-mail or vividrogers@gmail.com directly, including:
• 1 photograph of the survey mark at waypoint A.
• 1 photograph of the 'west' plaque and Melbourne CBD from waypoint B, OR the alternative photo described above.
• 3 photographs, in total, indicating your presence at each of waypoints C and D and E.
Photos are welcome in your public log, but I request that you omit spoilers pertaining to waypoint B, and avoid explicit naming of locations. My main concern is that I receive unambiguous qualifying evidence in a message, but you needn't wait for a reply before logging.
Be aware that some of these locations warrant a bit of forethought. Waypoint B is only accessible during daylight hours. Track conditions and telecommunications may be underwhelming en route to others. At least one location routinely receives snow during winter. The usual precautions are advised.
Virtual Reward - 2017/2018
This Virtual Cache is part of a limited release of Virtuals created between August 24, 2017 and August 24, 2018. Only 4,000 cache owners were given the opportunity to hide a Virtual Cache. Learn more about Virtual Rewards on the Geocaching Blog.
Special thanks to shogun-, without whom this virtual could never have existed, to buhfuhguh for some thought-provoking hiking experiences, and to Bunjil for even more constructive feedback than usual.